Ready, Set, BAKE for FFXIV's 8th Birthday!
Information
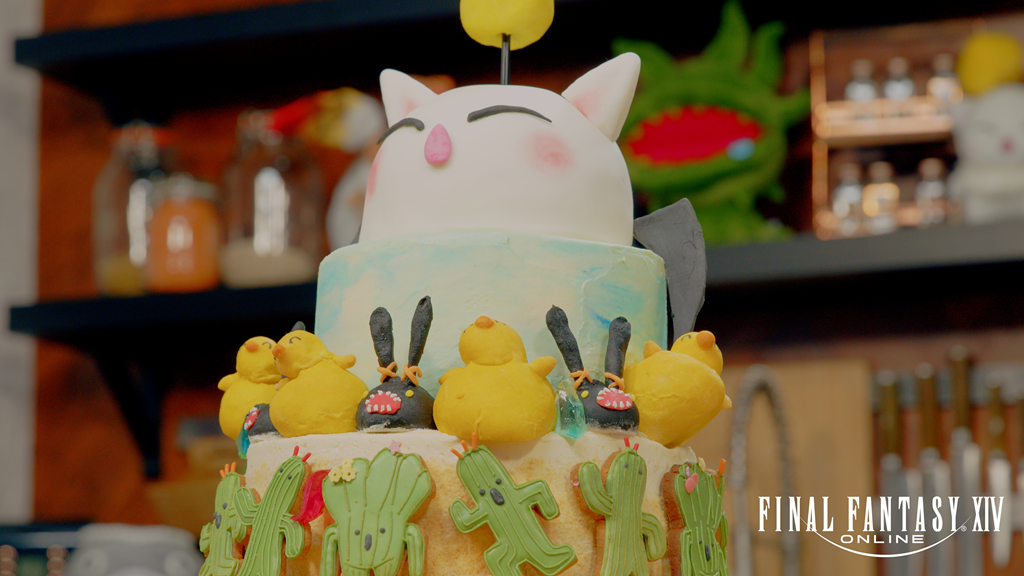
Hello everyone, this is Kiwikopo from the Community team!
As we near the end of the 8th Anniversary celebrations for A Realm Reborn, we wanted to share with you the full recipe for the amazing birthday cake created by baking extraordinaire Kim-Joy!

The recipe below is split into sections so you'll be able to make select bits or try your hand at recreating the full cake.
If you haven't watched the video yet, allow us to show you the process in all its cake-y glory!
Thank you again for all the amazing support over the past 8 years, the Anniversary is always a fond time for the team to remember the journey we've been on together and the journey we'll continue to travel on.
See you soon!
FINAL FANTASY XIV Birthday Cake
Makes:
One large 3-tiered cake
Needs:
2 x 5-inch cake tin, 3 x 7-inch cake tin, 3 x 9-inch cake tin
Key Equipment:
- White wire (for whiskers)
- Black cake pop stick
- Toothpicks
- Dowels
- Correct cake tin sizes
Ingredients
For the lemon cake:
*(this needs to be made twice - once for the top and middle tiers, and then again for the base tier)*
- 480g unsalted butter (cubed, at room temperature)
- 480g caster sugar
- 1tsp salt (or use salted butter and omit this)
- 480g eggs (about 8 medium)
- Zest of 5 unwaxed lemons
- 1tbsp vanilla bean paste
- 650g plain flour (or gluten free flour plus 2 1/4tsp Xanthan gum)
- 6tsp baking powder
- 300g full fat yoghurt
OR vegan cake alternative:
*(this needs to be made twice - once for the top and middle tiers, and then again for the base tier)*
Dry Ingredients:
- 625g self-raising flour
- 450g caster sugar
- 1/2tsp salt
- 2 1/4tbsp baking powder
- Zest of 5 unwaxed lemons
Wet ingredients:
- 700g soy milk
- 280g sunflower oil (or other neutral tasting oil)
- 1tsp liquid from tin of chickpeas (aquafaba)
- 1 1/2tbsp white wine vinegar
- 1tbsp vanilla bean paste
Buttercream:
- 550g unsalted butter (or use vegan butter that has at least 75% fat content)
- Salt, to taste (this adds a depth of flavor to the sweetness and helps to bring out flavor! I also often use salted butter, but if you like a less salty buttercream, add the salt yourself as then you can control the amount)
- 800g icing sugar
- 2tbsp vanilla bean paste
- A few tablespoons of milk to achieve a spreadable consistency (omit this if making vegan)
Kohakutou Style Jelly Gems
(Ideally leave these for several days to form a hard crust, and then they can be stored in an airtight jar for other future baking projects.)
- 150g water
- 140g caster sugar
- 2g agar agar powder
- A tiny drop of almond extract (or any clear flavoring) to taste
- Gel food dyes of your choice
Custard Mochi Spriggan
Wrapper:
- 60g glutinous rice flour
- 70g rice flour
- 40g cornflour
- 30g icing sugar
- 240ml milk (or plant-based milk)
- 2tbsp vegetable oil
- 2tbsp condensed milk (or vegan coconut condensed milk) (this makes it creamier, though you could just substitute whole milk or plant-based milk if you don't have condensed milk to hand!)
- Black gel food dye
Thick Custard Filling:
- 130g milk (or plant-based milk)
- 1tbsp vanilla bean paste
- 2 medium egg yolks (replace with extra 2tbsp cornflour plus 4tbsp milk to make vegan)
- 30g caster sugar
- 25g cornflour
- 25g melted butter (or vegan butter)
Tangzhong Bread Fat Chocobos
Tangzhong:
- 100g water
- 25g strong white flour
Dough:
- All of the tangzhong
- 125g whole milk
- 30g melted, unsalted butter
- 10g sugar
- 1tsp salt
- 1 large egg (or substitute with 30g milk, and 25g of extra melted butter)
- 350g strong white plain flour
- 7g fast action instant yeast
- Yellow and orange gel food dye
Gingerbread Cactuars
- 150g salted butter (or use vegan butter - minimum 75% fat content, ideally 80%)
- 120g dark muscovado sugar
- 2tsp black treacle
- 2tbsp beaten egg
- 2tbsp ground ginger
- 3/4tbsp ground cinnamon
- 1/4tsp ground cloves
- 225g plain flour
Royal Icing
- 40g egg white (substitute with chickpea water (aquafaba) for a vegan version)
- 225g icing sugar
- Extra egg white and icing sugar to adjust and get the right consistency
Plus:
- Food dyes: blue, two shades of green, black
- 1kg white fondant
- Pink edible luster dust
- 50g black fondant
- A pinch of pink fondant
- A small handful of yellow fondant (or marzipan)
- Sprinkles to decorate Cactuars
- 100g beige-colored biscuits (e.g digestives, rich tea or shortbread), crushed into fine crumbs
- Edible black ink pen (or use black food dye mixed with a little water)
Method
For the cake:
1) Preheat oven to 170C (fan). Grease the base and sides of 3 x 7-inch tins and 2 x 5-inch tins, and then line the bases with a circle of greaseproof paper.
2) Add butter, sugar and salt to a stand mixer bowl with balloon whisk attachment (alternatively use an electric hand whisk, though this will take a little longer as this is a large quantity!). Beat on medium speed until the butter is smooth, then beat on high speed until the butter is very fluffy and pale in color, scraping the sides of the bowl down a few times when needed. You can't overbeat the butter, so keep beating until it is definitely no longer getting lighter in color.
3) Add the eggs one at a time, beating well after each addition. Add the lemon zest and vanilla bean paste, and mix to combine.
4) Sieve in the flour and baking powder, and then mix in by hand using a spatula, until almost combined but there is still some visible flour.
5) Add the yoghurt, then continue mixing with the spatula until just combined. Be careful not to overmix. Divide the batter between the five cake tins. Bake the smaller cake tins for around 20-25 minutes, and leave the larger cakes in to bake for 30-35 minutes, or until a knife inserted in the center comes out clean.
6) Leave them in their tins for 5 minutes before running a knife around the edges and turning out on to cooling racks. Peel off the greaseproof paper.
7) Then repeat the steps above to make the cake again, this time dividing the batter between 3x 9-inch tins and baking for about 30-40 minutes.
For the vegan cake alternative:
1) Follow step 1 as above. Then, in a large bowl, mix the vinegar with the soy milk until it curdles and thickens.
2) Add the rest of the wet ingredients and the salt, and stir together.
3) In a separate large bowl, combine all the dry ingredients.
4) Add the dry ingredients to the wet, and whisk until just combined.
5) Pour straight away into the prepared tins, and bake the smaller cake tins for 20-25 minutes, and the larger for 30-35 minutes, or until springy on top and a skewer inserted into the center comes out clean.
6) Then follow step 6 and 7 as above.
For the buttercream:
1) Add the butter, salt and icing sugar to a bowl.
2) Beat on slow until the icing sugar is combined (you may also want to cover the bowl with a tea towel to prevent the icing sugar flying everywhere!)
3) Beat on high until light and fluffy, scraping down the sides of the bowl with a spatula when necessary to ensure everything mixes properly.
4) Add vanilla bean paste and whisk again until combined.
5) Add milk to soften (though not if making vegan) and achieve a spreadable consistency.
Kohakutou Style Jelly Gems:
1) Add the water, sugar, agar agar powder and almond extract (to taste) to a pan. Heat over medium heat and stir intermittently, until the agar agar and sugar has dissolved. Then heat on high until the mixture is boiling, and allow to continue bubbling for 3 minutes.
2) Remove from the heat and pour into a wide, shallow dish. Immediately use a toothpick to add blobs of food dye. You can use multiple colors. Spread and swirl the food dye through the mixture. Then chill in the fridge for 20 minutes until completely set, though it will also set at room temperature, just takes a little longer.
3) Once set, run a knife around the edges and then turn out on to a chopping board. Use a knife to carve the jelly into rock/crystal shapes. Then place on greaseproof paper and leave at room temperature, exposed to the air. In a couple of days, the jelly will become hard and crunchy on the outside - at this point, turn them over so that the other side is exposed to the air and leave to dry out on the outside again. Once hardened and crystallized, they are ready to use! Note: If you like, you can use these without forming the crust, they will just have a different/softer texture on the outside.
Custard Mochi Spriggan:
First make the filling:
1) Whisk together the eggs yolks (or vegan replacement), caster sugar and cornflour.
2) Add the milk and vanilla bean paste to a small saucepan, then heat over medium heat until just starting to bubble.
3) Then pour a small amount over the egg yolk mixture, whisking quickly and constantly as you pour. Gradually add the rest of the milk, still continuing to whisk constantly.
4) When all is mixed together, pour back into the pan and return to the heat. Continue whisking until the mixture is very, very stiff (can hold a spoon upright!).
5) Remove from the heat and add the butter, then stir until it melts in.
6) Transfer to a bowl, cover with cling film and chill in the fridge until firm. When chilled, shape the custard into 10g round balls. Flour your hands and the work surface to prevent sticking whilst shaping. Place these on a plate lined with greaseproof paper, and leave in the fridge for now.
Tip for the custard: When the mixture thickens and starts looking like it might go lumpy - just take it off the hob temporarily and whisk again until all smooth before returning to the heat. You need short bursts of heat, but you will need to take it off the hob to catch up with whisking - as this custard gets very thick!
Next make the mochi wrapper:
1) Add all the ingredients to a microwaveable bowl (adding enough black food dye to color - it will darken a little as it thickens in the microwave) and whisk together until smooth and combined.
2) Cover with cling film, then microwave on high in 1-minute bursts, whisking well after each burst.
3) You will need to microwave it for a total of 3-4 minutes, and switch to mixing with a spatula towards the end as it will get very thick.
4) Once thick, turn out on a surface coated with a generous amount of glutinous rice flour or cornflour to prevent sticking. Divide into 25g individual pieces.
5) Use your fingers to press a piece into a rough circle shape (slightly thicker in the middle than the sides), making sure to use enough glutinous rice flour/corn flour to prevent sticking.
6) Then place a ball of custard in the center and lift the sides of the dough up to encase the filling, pressing together firmly on top to seal. Turn this around so the base is now the top.
7) Add ears by shaping the mochi around toothpicks, then pressing into the top of the mochi.
Just before assembling the cake - decorate these as Spriggans - wipe a tiny bit of oil on the surface just to remove any rice flour/cornflour. Then press on small pieces of colored fondant for the eyes, mouth, etc. Pipe little triangles or dots of white icing (use icing left over from Cactuars) on the mouth to represent the teeth.
Tangzhong Bread Fat Chocobos:
1) Make the tangzhong. Using a balloon whisk, mix the water and flour in a saucepan. Switch to a spatula, and continue to stir until over medium heat, until thickened to a pudding-like consistency and has reached 65C. Spoon into a bowl, cover with cling film (make sure this touches the surface of the tangzhong) and place in the freezer for 10 minutes.
2) Meanwhile, warm the milk in the microwave. It should be warm but not hot. Also, melt the butter in the microwave. Add the milk and butter to a large bowl, plus the sugar and salt. Take the tangzhong out of the freezer and add to the bowl along with the egg (or vegan replacement). Add yellow food dye. Whisk all together.
3) Add the flour and yeast. If using a stand mixer, just allow the machine to knead for 10 minutes with the dough hook attachment - adding more yellow food dye if needed for color. If working by hand, then use a wooden spoon to combine everything into a shaggy ball of dough, then turn out on to a floured surface.
4) Knead by hand for about 10-15 minutes. The dough will be sticky to start with, but avoid adding too much flour - it will gradually become less sticky as you knead it. If the dough sticks to the surface, use a dough scraper to scrape it off. Keep kneading until the dough is smooth, it will still be a little tacky but that is normal.
5) Place the dough into a lightly oiled large bowl and cover with cling film. Leave to rise at room temperature until about doubled in size. This takes about an hour, but it depends on the temperature of where you leave it.
6) When the dough has doubled in size, turn it out on to a lightly floured surface and knock back. Shape into Fat Chocobos - these are made up of two balls of dough (one much larger than the other), then little arms and a beak. To shape the balls of dough, roll it between the palms of your hands, then to get it smooth, use your fingers to stretch the dough across and create a neat seam which will be the bottom. Place the smaller ball of dough on top of the larger, pressing to make sure it sticks. Add orange food dye to a small amount of dough, and knead in until it's all combined. Use this for the Chocobo's beak. Add small amounts of dough for the arms. Repeat until you've made a few Chocobos and used up the dough. You can make them all different sizes to add character. Place these on a baking tray lined with baking paper. Cover lightly with oiled cling film and leave to rise until nearly doubled in size. The time this takes varies depending on the temperature of the location, but won't be as long as the first rise. You are looking for the dough to have nearly doubled in size and spring back halfway when lightly indented with a finger. 15 minutes before the end of the rise, preheat your oven to 180C.
7) Bake for 15 minutes. You may need to cover the buns with foil after 5-10 minutes, just to prevent them browning too much. When baked, leave to completely cool on a wire rack. When cool, use black edible ink pen to add eyes OR paint eyes on using black food dye mixed with a little drop of water.
Gingerbread Cactuars:
1) Add the butter, muscovado sugar, salt and treacle to a bowl, and whisk until soft, smooth and combined.
2) Add the 2 tablespoons of beaten egg, then add the ginger, cinnamon and cloves. Mix until just combined.
3) Add the flour and combine using your hands until it forms a ball. Turn out on to a lightly floured surface and roll out to the thickness of a pound coin. Cut around cardboard templates to cut out Cactuar shapes, and transfer to a lined baking tray (that you can fit in the fridge).
4) Chill the biscuits for 15 minutes. Preheat the oven to 170C while you wait.
5) Bake the biscuits for 10-12 minutes, or until just beginning to color. Let cool for 10 minutes on the baking tray, before carefully transferring to a wire rack.
Royal Icing and Decorating the Cactuars:
1) Use an electric mixer to combine the egg white/aquafaba and icing sugar until you get a smooth consistency.
2) Then add tiny amounts of extra egg white/aquafaba and/or icing sugar to get the right consistency - it should hold a trail for 10-15 seconds, before disappearing in.
3) Remove a tablespoon to a separate bowl and dye this black.
4) Remove 3 tablespoons to another bowl and dye this a dark green.
5) Place these colors into two separate piping bags.
6) Color the remaining icing a lighter green color, and then split this between two piping bags - a large tablespoon in one, and the remainder in the other. So in total you will three bags of green icing (two different shades, and one bag of black icing.
7) Cut a small opening on the two bags of green icing that contain the smaller amount.
8) Cut a bigger opening in the larger. Cut a small opening on the bag of black icing.
9) Pipe an outline on a Cactuar biscuit using the lighter green icing with smaller tip.
10) Then fill in the center with the other piping bag (larger opening) of the same color.
11) Use a toothpick to spread the icing to the edges and burst any bubbles, though work quickly to do this before the icing forms a crust on top.
12) Leave this to completely set for at least 4 hours, preferably overnight.
13) Then use the darker green icing to pipe the lines on top, and black food dye for face.
14) Add a few sprinkles to embellish. (See video or image to see the final design to work towards!). Ideally leave these to set again for at least 3 hours, before using to decorate the cake.
To Assemble:
1) Once all the cakes are cool, use a serrated knife to cut off any domes on top, so that they are flat.
2) Place a flat plate (one that you are happy to serve the cake on) on top of a cake decorating turntable. Spread a blob of buttercream in the center, then place a 9-inch cake layer on top. Spread a thin layer of buttercream on top using an offset palette knife. Place the next cake layer on top and repeat until all three 9-inch layers are stacked. Now to crumb coat the cake. Cover the outside of the cake in more buttercream, then use a metal scraper to smooth the sides, using the turntable to help. There will be crumbs in the layer and the cake showing through, that's fine! Smooth in the top edges using the palette knife, and then scatter the biscuit crumbs all up the sides of the cake and around the base, to create a desert backdrop effect for the Cactuars later. Place in the fridge (2 hours) or freezer (30 mins) to chill until firm. Repeat the crumb coating with the 7-inch cakes, the only difference is this time work on a thin cake board/piece of cardboard (which will be hidden later), and don't add the biscuit crumbs. Again, chill the cake.
3) Once the 7-inch cake has chilled and buttercream is firm, remove from the fridge and place back on turntable. Dye a small amount of buttercream blue, then place random blobs of blue and white buttercream all over the cake. Smooth the sides and top in the same way as before, though this time there should be a nice marbling effect. Then place back in the fridge to chill.
4) Next, stack the 5-inch cake in the same way, then use a serrated knife to carve so that the top is rounded. Crumb coat with buttercream, then smooth using a palette knife. Place in the fridge to chill.
5) Once chilled, roll out the white fondant into a large circle, about the thickness of a pound coin. Then lift the fondant and place on top of the carved and crumb coated cake. Use a fondant smoother to smooth any bumps and ensure the fondant adheres. Then use a knife to cut off the excess around the bottom edges. Chill again in the fridge.
6) When all three tiers are chilled, it's time to stack. Note: If the cake needs to sit around for a while, ensure you place three dowels in the bottom tier. Stack the cakes in size order, finishing with the top Moogle tier.
7) Now to decorate the top tier so it really looks like a Moogle! Use leftover fondant to shape the ears, then carefully press these on top so that they adhere. You can use toothpicks to help if needed. Shape the nose using pink fondant and press on. Shape the eyes using black fondant and press on. A little royal icing may help to stick down the nose/eyes/ears. Press white wire (or similar) into the sides for the whiskers. Shape a yellow pompom (using fondant or marzipan) on a black cake pop stick, and insert on top. Just make sure the pompom isn't too heavy and slides down. Then brush on pink edible luster dust to Moogle rosy cheeks and pink bits on ears. Shape the Moogle's wings out of black fondant (roll it out and then cut into shape) and attach to toothpicks. Leave out to harden and strengthen (or to speed up you can place it in a fan oven, warm but switched off or knead in a little tylose powder to firm up your fondant), then place on cake.
8) Finish by adding all the Cactuars around the outside of the base cake (use a little buttercream to stick them down if transporting cake), alternately arranging the Fat Chocobos and Spriggans around the middle tier, and adding kohakutou gem stones in front of the Spriggans.
Search Blog
Search by Category
- Information (338)
- Event (167)
- Backstage Investigators (17)
- Lyrics (29)
- Other (44)
- Merch / Goods (42)
- Promotion (15)
Monthly View
Select Month
- May 2026
- March 2026
- February 2026
- January 2026
- December 2025
- October 2025
- August 2025
- July 2025
- May 2025
- April 2025
- March 2025
- February 2025
- January 2025
- December 2024
- November 2024
- October 2024
- September 2024
- August 2024
- May 2024
- April 2024
- March 2024
- February 2024
- January 2024
- December 2023
- October 2023
- September 2023
- August 2023
- July 2023
- June 2023
- March 2023
- February 2023
- January 2023
- December 2022
- November 2022
- October 2022
- September 2022
- August 2022
- July 2022
- June 2022
- April 2022
- March 2022
- February 2022
- January 2022
- December 2021
- November 2021
- October 2021
- September 2021
- August 2021
- July 2021
- June 2021
- May 2021
- April 2021
- February 2021
- January 2021
- December 2020
- November 2020
- October 2020
- September 2020
- August 2020
- April 2020
- March 2020
- February 2020
- January 2020
- December 2019
- November 2019
- October 2019
- September 2019
- August 2019
- July 2019
- June 2019
- May 2019
- April 2019
- March 2019
- February 2019
- January 2019
- December 2018
- November 2018
- October 2018
- September 2018
- August 2018
- July 2018
- June 2018
- May 2018
- April 2018
- March 2018
- February 2018
- January 2018
- December 2017
- November 2017
- October 2017
- September 2017
- August 2017
- July 2017
- June 2017
- May 2017
- April 2017
- March 2017
- February 2017
- January 2017
- December 2016
- November 2016
- October 2016
- September 2016
- August 2016
- July 2016
- June 2016
- May 2016
- April 2016
- March 2016
- February 2016
- January 2016
- December 2015
- November 2015
- October 2015
- September 2015
- August 2015
- July 2015
- June 2015
- May 2015
- April 2015
- March 2015
- February 2015
- January 2015
- December 2014
- November 2014
- October 2014
- September 2014
- August 2014
- July 2014
- June 2014
- May 2014
- April 2014
- March 2014
- February 2014
- January 2014
- December 2013
- November 2013
- October 2013
- September 2013
- August 2013
- July 2013
- June 2013
- May 2013
- April 2013
- March 2013
- February 2013
- January 2013
- December 2012
Search by Tags
- All Saints' Wake
- April Fools
- Backstage Investigators
- Breaking Brick Mountains
- Collaboration
- Community Spotlight
- Crossover
- Dev. Insight
- Elunia Arlana
- Fan Festival
- Fan Gathering
- FF16
- FFXVI
- Hatching-tide
- Heavensturn
- Housing
- Information
- Little Ladies' Day
- Live Event
- Livestream
- Lyrics
- Make It Rain Campaign
- Merchandise
- Monster Hunter Wilds
- Moonfire Faire
- PAX
- Report
- Seasonal Event
- Starlight Celebration
- THE PRIMALS
- The Rising
- Update Details
- Valentione's Day
- Yo-kai Watch