This blog is intended for people that are curious about how UCOB is done in the Mana Data Center.
This is my translated interpretation of Lily Doll's post, which is the go-to place for reference. I take no credit in the creation of the original macro or the strategies made by the original creator.
Short link to this blog:
https://ffxiv.link/0126459Short link to Lily Doll's blog:
https://ffxiv.link/096666◆Party Composition ―――――――――――――――――
≫MT ≫H1…Pure Healer (WHM/AST) ≫D1…Melee
≫ST ≫H2…Barrier Healer #1 ≫D2…Caster
≫H3…Barrier Healer #2 ≫D3…Range
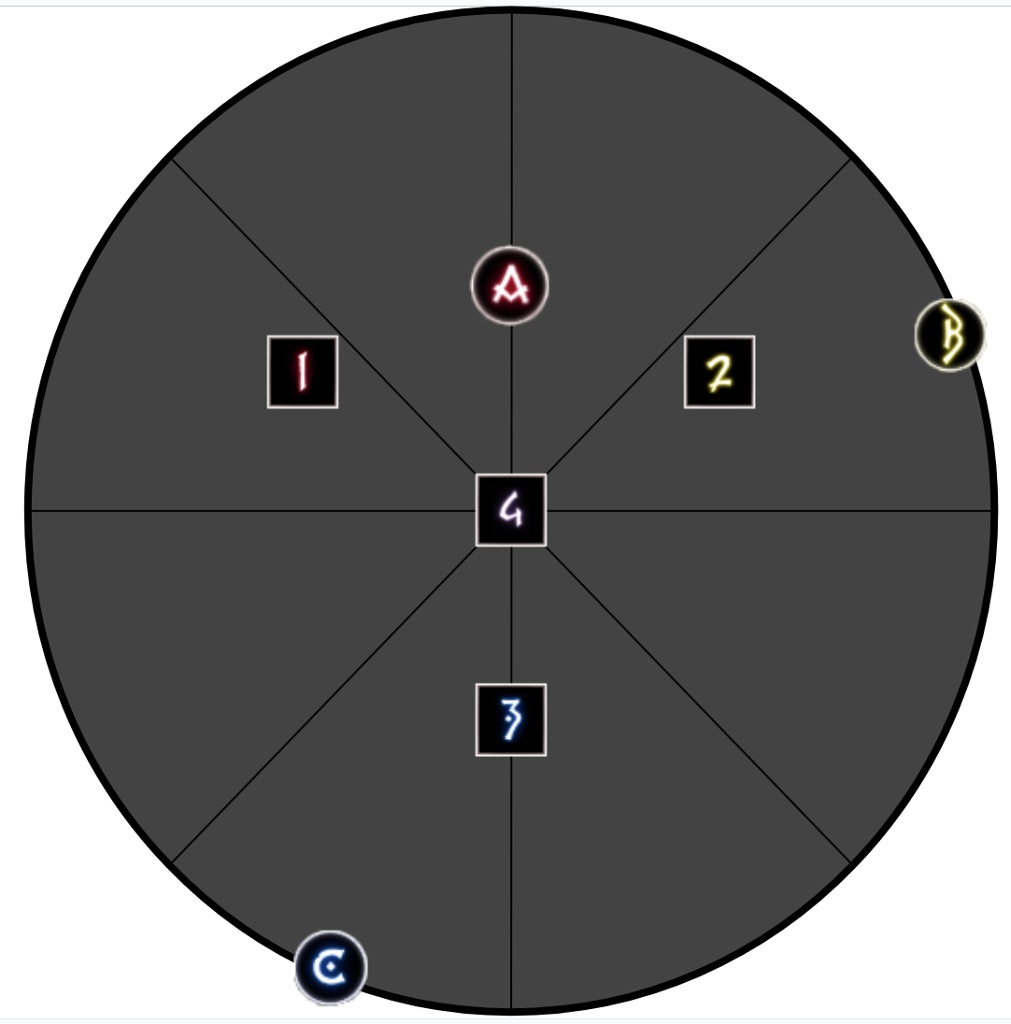
◆Waymarks ――――――――――――――
◆P1 - Twintania ――――――――――――――
■Spread Positions(▲Boss/●Stack)
MT ST
D1 ▲ D2
H1 ● H3
D3 H2
■Stack : Back of Boss 1st and 2nd Stack:5 Man Stack (No Tanks and H1) (If marker is on H1, remove D3
from stack)
3rd stack onwards: 7 Man Stack (No Liquid Hell baiter)
■Neurolink Drop:[1](〜75%)→[2](〜45%)→[3]
■Hatch : [1]← D1 D2 D3→[2]
■Liquid Hell Puddle Baits:H2
■Stack at 3 marker after defeating Twintania →Nael Transition
◆P2 - Nael――――――――――――――
■ Cleaves&Meteor Stream
D3 D1【Pillar】D2 H3
MT ST
H1 H2
※Dodge CCW for Cleaves
★Start of Phase - Position boss between 1 and 4 marker | Stack at 4
■Chain Lightning [True North]
① ②
▼
Party
①← MT ST H1 H2 H3 D1 D2 D3 →②
■Wings of Salvation
┣Lunar Dynamo:Drop puddle at 4→A→2 markers 。
┗Iron Chariot: Dodge to 3 marker then drop puddle at 3→4→A markers。
■Raven's Dive
(A)
D3 ST H3
①D1 ▼ D2②
H1 MT H2
④
■Divebombs
┣Markers:1st marker at B、2nd marker : Move South, Drop 1st Hypernova, then C marker
┣No markers:Stack at 4 marker
┗Everyone:Use Tank LB3 and Shields when Nael disappears,Use anti-knockback on Dive / Meteor
■Seventh Umbral Era:Stack at 3 marker
◆P3 - Bahamut Prime――――――――――――――
=====Quickmarch Trio=====
■ Spreads and Twister Movements
▼▼▼ ※Three dragons become Relative North。
H1(↑) (↑)D1
MT(→) (←)D2
ST (→) (←)D3
H2(↓) (↓)H3
■Earth Shaker & Tempest Wing
H1
H2ーMTー▼ DPS MT Tether:CW→ W ST Tether:CCW → S
ST H1:N Closer to DPS | H2:W | H3:S Closer to DPS
H3 DPS:E, Max melee for easier tether grab on Tank
=====Blackfire Trio=====
■Liquid Hell Puddle
┗1st puddle on Mid at 4 marker→ Move towards Nael。
■Towers
┣▼:Nael | ◎:Stack marker | ①~⑤:Liquid Hell
┣Healer Tower Priority:↑H1>H2>H3↓
┗For safety, Tank that is stacking also try to soak healer tower nearby
▼
H←⑤→T/DPS
H↑ ④ D
③
①
H↓ ◎ T
=====Fellruin Trio=====
■Bahamut and Twintania being North
┣★:Between Bahamut and Twintania | ●:Bahamut and Twintania
Spreads for Raven's Dive Spreads for Meteor Stream
MT ST
● ★ ● ● ★ ●
MT ST H2
D1 D2
D1 H2 D2
H1
D3 H1 H3 D3 H3
=====Heavensfall Trio=====
■Dive &Tower Spread(▼:Nael)
┣①~④:CW from Nael
┗⑴~⑷:CCW from Nael
▼
⑴ ① ※If a tower spawns in front of Nael, this belongs to ①。
⑵ ② ①:H1 / ②:H3 / ③:D1 / ④:D2
⑶ ③ ⑴:H2 / ⑵:MT / ⑶:ST / ⑷:D3
⑷ ④
=====Tenstrike Trio=====
A
[1] [2]
H1 D1
MT D2 ※Hatch - Take nearest Neurolink. if 3 hatches are on one side, middle hatch adjust
ST D3 ※Interceptors - Take nearest Neurolink. Furthest player adjust if two people are
H2 H3 near a Neurolink
[3]
Earth Shaker #1 -> Marked players spread North -> Stack at A
Earth Shaker #2 -> Unmarked players pre-position around 3 marker -> Spread South
=====Grand Octet=====
■Starting Point:Middle of Arena(On 4 Marker)
┣Confirm Bahamut's position→Move to Opposite direction。
┗If Nael is opposite Bahamut、Offset by one dragon position CW/CCW in the direction to be rotating。
■If Bahamut is on a:
┣Cardinal:Rotate CCW around the room
┗Intercardinal :Rotate CW around the room
■Twister, Divebomb & Towers
┗▼:Twintania / ●:Divebomb
▼
● ① ※Use Tank LB3、Ignore stack markers
② Towers -> First come first serve
④
③
★P4 - Adds ――――――――――――――――
MTST Position bosses at A
D1 A D2 Liquid Hell Puddle Baits:D3
[1] [2] Stack at 4 marker → Clock spread positions
H1 H3
D3 [3] H2 Hatch soaks on Neurolink
[1]:D1 [2]:D2 [3]:D3
・MT takes Nael, ST takes Twintania
Quotes
・Lunar Dynamo (IN) -> Ranged dodges out
・Raven's Dive -> H1 stands on Mid (4 Marker)
■Twister Spread ■Lunar Dynamo (IN) → Raven's Dive (Spread) ■Iron Chariot (OUT) →Raven's Dive
(SPREAD)
MT ST MT ST D1 D2
D1 D2 D1 D2 MT ST
H1 H3 H1 H3 H1 H3
D3 H2 D3 H2 D3 H2
・After Megaflare, Tank reposition Twintania to A
■ Neurolink Resolving
┣D1、D2:Resolve Hatch → Twister
┗D3:Twister→Resolve Hatch
★P5 - Golden Bahamut ――――――――――――――――
【Opening】MT Mitigation、※MT Provoke
【●Morn Afah1】ST Reprisal, Soil, Kera, D3, (AST's CU)
[▽Akh Morn1]MT/ST Mitigation Rampart, Feint
[▽Akh Morn2]★MT Invuln
【●Morn Afah2】MT Reprisal, ST 90s, Soil, Kera, Addle
【●Morn Afah3】ST Reprisal, MT 90s, Soil, Kera, (AST's CU)
[▽Akh Morn3]MT/ST Kitchen Sink, Feint
【●Morn Afah4】MT Reprisal, ST 90s, Soil, Kera, D3
[▽Akh Morn4]★ST Invuln
【●Morn Afah5】ST Reprisal, MT 90s, Soil, Kera, Addle, (AST's CU)
===Spreads for Morn Afah Enrage===
MT
D1 Bahamut D2
ST
H1 H3
D3 H2