
Last Update 04/28/2026


As you progress through the early stages of the game, tutorial screens known as active help windows will provide a gradual introduction to the various controls. All previously viewed active help tutorials can be displayed by selecting Active Help in the System menu. When playing the Windows® and Mac versions, players will be able to choose between mouse and keyboard controls and gamepad controls. Once a control scheme has been chosen, settings can be adjusted further in the Keybind and Configuration menus.
To change your control settings, press the Esc key, or select System in the main menu, then access the Control Settings tab in the Character Configuration menu.
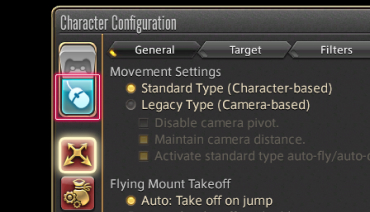
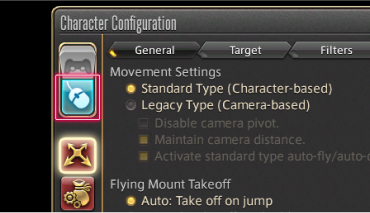


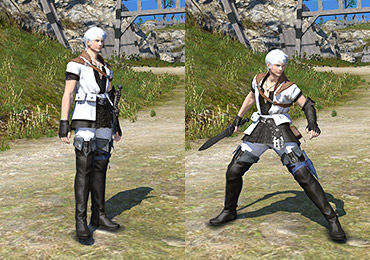
Standard control scheme using a mouse and keyboard. Learn more about playing with this control scheme.
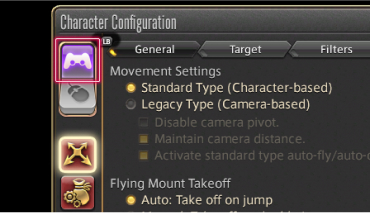
Customized control scheme using actions set to the cross hotbar. Learn more about this control scheme.
Standard control scheme using a mouse and keyboard. Learn more about playing with control scheme.
Customized control scheme using actions set to the cross hotbar. Learn more about this control scheme.
All XInput compliant gamepads are compatible with the game. Furthermore, button allocations for all gamepad models can be adjusted. This can be performed when logging in for the first time, or from the Gamepad Settings tab of the System Configuration menu.
* If you are unable to adjust button allocations, the issue may be resolved by unchecking the "Enable POV" option.
The Mac version of FINAL FANTASY XIV is compatible with the following gamepads:
・Xinput gamepads
・DUALSHOCK®4 wireless controllers
・DualSense® wireless controllers
・Xbox One wireless controllers
・Xbox Series X|S wireless controllers
* If you are unable to adjust button allocations, the issue may be resolved by unchecking the "Enable POV" option.
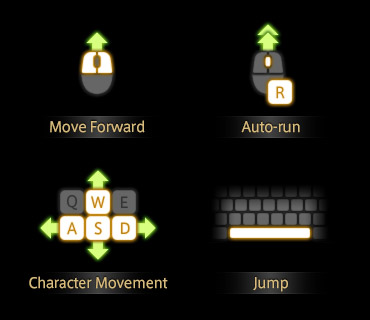
You can move your character using either a keyboard or mouse. When using a keyboard, press the WASD keys to move. When using a mouse, press the left and right mouse buttons at the same time to move forward. To change direction while moving, keep both buttons pressed and drag the mouse left or right.
Auto-run
By clicking the mouse wheel, you can set your character to auto-run. Holding the right mouse button while dragging the mouse will change direction. Holding the left mouse button while dragging the mouse will move the camera.
Jump
To jump, press the spacebar on the keyboard. This can be used to leap over obstacles like small rocks or low fences.
For details on other keys assigned to character movement, please refer to the Mouse Controls and Keyboard Controls sections.
* When using the WASD keys to move your character, you can select Standard Type for character-based movement, or Legacy Type for camera-based movement.

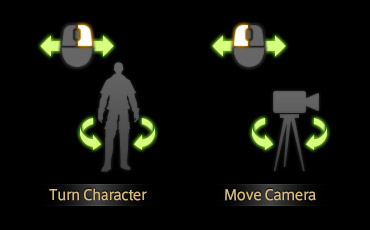
To control the camera, drag the mouse while pressing either the left or right button.
Left Button:
Only the camera view will rotate, and not your character.
Right Button:
Your character faces the direction in which you rotate the camera.
* The direction of camera rotation can be changed in the Character Configuration menu.
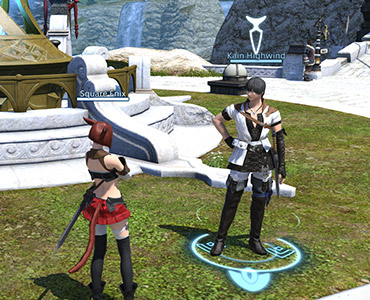
You can target a character, or an object such as a gate or aetheryte, by moving the mouse cursor over the intended target and clicking the left mouse button.
With a right click, you can perform one of several actions depending on the selected target.
Player Character: Select as a target (right-click to open the subcommand menu)
NPC: Start a conversation
Enemy: Engage auto-attack
Object: Interact with the object
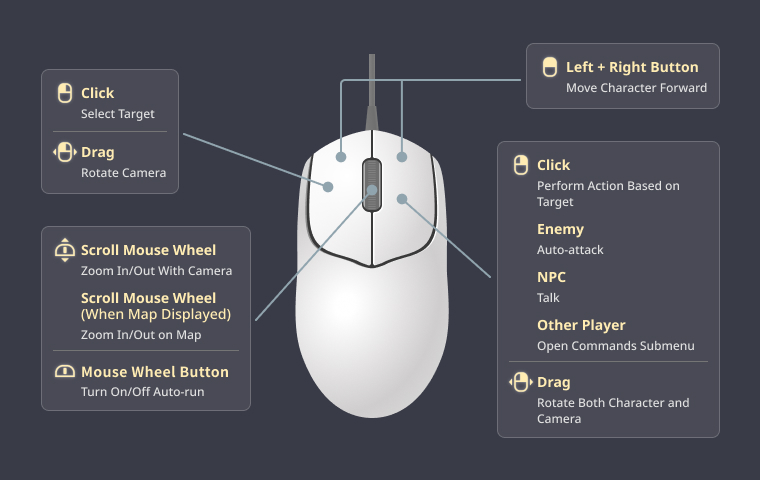

| Command | Default Button |
|---|---|
| Click: Select Target Drag: Rotate Camera |
Left Button |
| Click: Perform Action Based on Target Enemy = Auto-attack NPC = Talk Other Player = Open Commands Submenu |
Right Button |
| Move Character Forward | Left + Right Button |
| Zoom In/Out With Camera Zoom In/Out on Map (When Displayed) |
Scroll Mouse Wheel |
| Turn On/Off Auto-run | Mouse Wheel Button |
* The direction of camera rotation can be changed in the Character Configuration menu.
| Command | Default Button |
|---|---|
| Select/Confirm Display Submenu Drag Area Map (When Displayed) |
Left Button |
| Zoom Map In/Out (When Displayed) | Scroll Mouse Wheel |
| Map Link (When Displayed) |
Ctrl+Right-click
control+Right-click
|
The following is a list of default key bindings. To change key bindings, press NUM-, or click System in the main menu, then select Keybind and choose the appropriate category from the top of the menu.


* When using the WASD keys to move your character, you can select Standard Type for a character-based view, or Legacy Type for a camera-based view.
* Using a gamepad will enable direct chat by default, resulting in keystrokes registering in the log window automatically.
Direct chat must be disabled in order to use commands with the keyboard.
This setting can be changed in the General tab of the Character Configuration menu.
* When using the WASD keys to move your character, you can select Standard Type for a character-based view, or Legacy Type for a camera-based view.
* Using a gamepad will enable direct chat by default, resulting in keystrokes registering in the log window automatically.
* On OS, the command key can function like the control key.
* Operating system commands for shift, control, option, and all function keys take priority over in-game systems. As such, these commands cannot be used for keybinds.
Direct chat must be disabled in order to use commands with the keyboard.
This setting can be changed in the General tab of the Character Configuration menu.
* When using the WASD keys to move your character, you can select Standard Type for a character-based view, or Legacy Type for a camera-based view.
* In controller mode, direct chat will be enabled by default, resulting in keystrokes registering in the log window automatically.
Direct chat must be disabled in order to use commands with the keyboard.
This setting can be changed in the General tab of the Character Configuration menu.
* When using a keyboard with the PS5®, the print screen and pause keys cannot be reassigned, as they are allocated for various system functions.
* When using the WASD keys to move your character, you can select Standard Type for a character-based view, or Legacy Type for a camera-based view.
* In controller mode, direct chat will be enabled by default, resulting in keystrokes registering in the log window automatically.
Direct chat must be disabled in order to use commands with the keyboard.
This setting can be changed in the General tab of the Character Configuration menu.
* When using a keyboard with the PS4®, the print screen and pause keys cannot be reassigned, as they are allocated for various system functions.
* When using the WASD keys to move your character, you can select Standard Type for a character-based view, or Legacy Type for a camera-based view.
* In controller mode, direct chat will be enabled by default, resulting in keystrokes registering in the log window automatically.
Direct chat must be disabled in order to use commands with the keyboard.
This setting can be changed in the General tab of the Character Configuration menu.
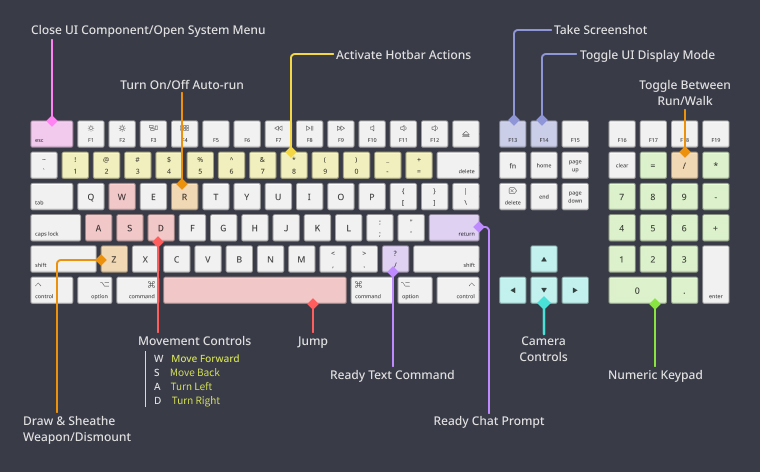
| Command | Default Key | |
|---|---|---|
| Move Forward | W | |
| Move Back | S | |
| Turn Left | A | |
| Turn Right | D | |
| Strafe Left | Q | |
| Strafe Right | E | |
| Draw & Sheathe Weapon/Dismount | Z | Z |
| Toggle Between Run/Walk | NUM/ | |
| Turn On/Off Auto-run | R | |
| Jump | Spacebar |
| Command | Default Key |
|---|---|
| Point Camera Up | ↑ |
| Point Camera Down | ↓ |
| Point Camera Right | → |
| Point Camera Left | ← |
| Zoom Camera In | Page Up |
| Zoom Camera Out | Page Down |
| Change Camera | Home |
| Return Camera to Saved Position | End |
| Save Current Camera Position |
Ctrl+End
control+End
|
| Return Camera to Default Position |
Ctrl+Shift+End
control+shift+End
|
| Flip Camera | V |
| Lock Camera On Target | NUM5 |
| Tilt Camera Up |
Ctrl+↑
control+↑
|
| Tilt Camera Down |
Ctrl+↓
control+↓
|
| Face Camera |
Pause
F15
|
| Command | Default Key |
|---|---|
| Cycle Through Enemies (Nearest to Farthest) | Tab |
| Cycle Through Enemies (Farthest to Nearest) |
Shift+Tab
shift+Tab
|
| Face Target | F |
| Target Self | F1 |
| Target Members in Party List | F2 - F8 |
| Target Pet/Familiar | F9 |
| Target the Target of Your Current Target | T |
| Target Enemy Attacking You |
Shift+T
shift+T
|
| Target Focus Target | F10 |
| Target Nearest Enemy | F11 |
| Target Nearest NPC or Object | F12 |
| Set/Clear Focus Target |
Shift+F
shift+F
|
| Cycle Up Through Enmity List |
Ctrl+NUM8
control+NUM8
|
| Cycle Down Through Enmity List |
Ctrl+NUM2
control+NUM2
|
| Cycle Through Alliance List (Forward) |
Ctrl+NUM6
control+NUM6
|
| Cycle Through Alliance List (Backward) |
Ctrl+NUM4
control+NUM4
|
| Command | Default Key | |
|---|---|---|
| Ready Chat Prompt |
Enter
enter
|
|
| Ready Text Command | / | / |
| Temporarily Switch Chat Mode to Reply (Cycle Forward) |
Alt+R
option+R
|
|
| Temporarily Switch Chat Mode to Reply (Cycle Back) |
Alt+Shift+R
option+shift+R
|
|
| Temporarily Switch Chat Mode to Say |
Alt+S
option+S
|
|
| Temporarily Switch Chat Mode to Shout |
Alt+H
option+H
|
|
| Temporarily Switch Chat Mode to Party |
Alt+P
option+P
|
|
| Temporarily Switch Chat Mode to Yell |
Alt+Y
option+Y
|
|
| Reply (Repeat to Cycle Through PCs) |
Alt+R
option+R
|
|
| Temporarily Switch Chat Mode to Free Company |
Alt+F
option+F
|
|
| Temporarily Switch Chat Mode to PvP Team |
Alt+T
option+T
|
|
| Temporarily Switch Chat Mode to Cross-world Linkshell (Cycle Forward) |
Alt+C
option+C
|
|
| Temporarily Switch Chat Mode to Cross-world Linkshell (Cycle Back) |
Alt+Shift+C
option+shift+C
|
|
| Temporarily Switch Chat Mode to Linkshell (Cycle Forward) |
Alt+L
option+L
|
|
| Temporarily Switch Chat Mode to Linkshell (Cycle Back) |
Alt+Shift+L
option+shift+L
|
|
| Temporarily Switch Chat Mode to Alliance |
Alt+A
option+A
|
|
| Temporarily Switch Chat Mode to Novice Network |
Alt+N
option+N
|
| Command | Default Key | |
|---|---|---|
| Confirm | NUM0 | |
| Cancel | NUM. | |
| Display Submenu | NUM* | |
| Move Cursor Up/Cycle Up Through Party List | NUM8 | |
| Move Cursor Down/Cycle Down Through Party List | NUM2 | |
| Move Cursor/Target Cursor Left | NUM4 | |
| Move Cursor/Target Cursor Right | NUM6 | |
| Cycle Through HUD Components | NUM1 | |
| Select the Main Menu | NUM+ | |
| Draw/Sheathe Weapon * While Mounted: Dismount |
Z | Z |
| Character | C | |
| Currency |
Ctrl+C
control+C
|
|
| Free Company | : | : |
| Linkshells | L | |
| Inventory | I | |
| Armoury Chest |
Ctrl+I
control+I
|
|
| Open Chocobo Saddlebag |
Shift+Ctrl+I
shift+control+I
|
|
| Map | M | |
| Signs |
Shift+M
shift+M
|
|
| Waymarks |
Ctrl+M
control+M
|
|
| Actions and Traits | P | |
| Social | O | |
| Duty Finder | U | |
| Timers |
Ctrl+U
control+U
|
|
| Journal | J | |
| Character Configuration | K | |
| System Configuration |
Ctrl+K
control+K
|
|
| Target Filter | X * | |
| Crafting Log | N | |
| Gathering Log | B | |
| Hunting Log | H | |
| Fishing Log | Y | |
| Fish Guide |
Ctrl+Y
control+Y
|
|
| Orchestrion List |
Ctrl+O
control+O
|
|
| Emote List | (No Default Assignment) | |
| System | NUM - | |
| Cycle Through UI Component Tabs (Forward/Back) | NUM9/NUM7 | |
| Toggle UI Display Mode |
Scroll Lock
F14
|
|
| Take Screenshot |
Print Screen
F13
|
|
| Change Window Size |
Ctrl+Home
control+Home
|
|
| Close UI Component/Open System Menu |
Esc
Escape
|
* When pressed, the target filter will render players, NPCs, enemies, or objects untargetable according to your settings. Although disabled by default, it can be enabled by checking the box for "Enable target cycling" on the Filters tab under Control Settings in the Character Configuration menu.
| Command | Default Key | |
|---|---|---|
| Move Forward | W | |
| Move Back | S | |
| Turn Left | A | |
| Turn Right | D | |
| Strafe Left | Q | |
| Strafe Right | E | |
| Ascend * While Grounded: Jump |
Spacebar | |
| Descend * While Grounded: Jump |
Ctrl+Spacebar
control+Spacebar
|
|
| Land * Available only when flying. * While Grounded: Dismount |
Z | Z |
| Diving * Available only when swimming. |
Ctrl+Spacebar
control+Spacebar
|
* You will be able to ride a flying mount after making a certain amount of progress in-game.
* You will be able to dive after making a certain amount of progress in-game.

Character Movement
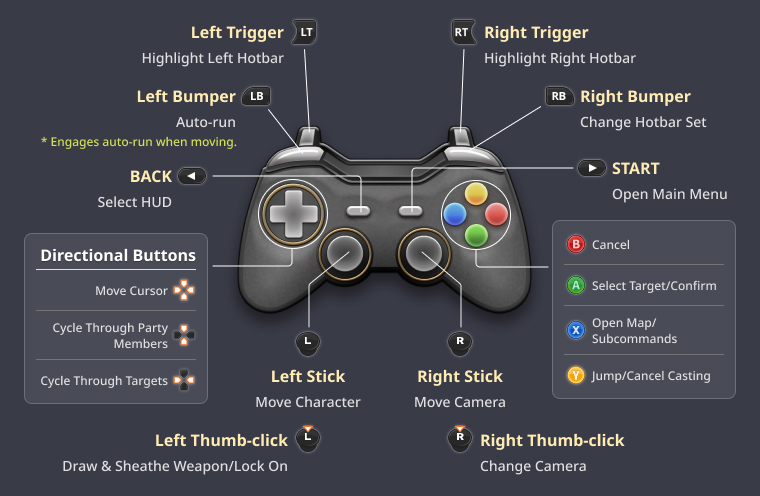
Move your character by using the left stick. Hold down B then use the left stick to make your character walk.
Character Movement
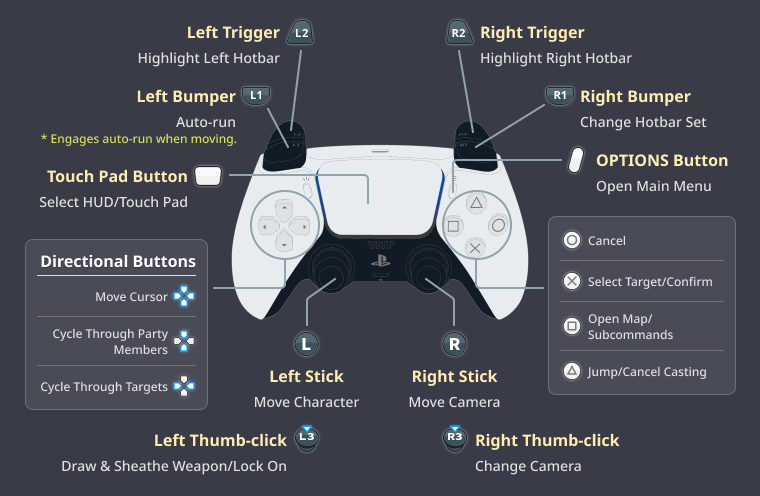
Move your character by using the left stick. Hold down ○ then use the left stick to make your character walk.
Character Movement
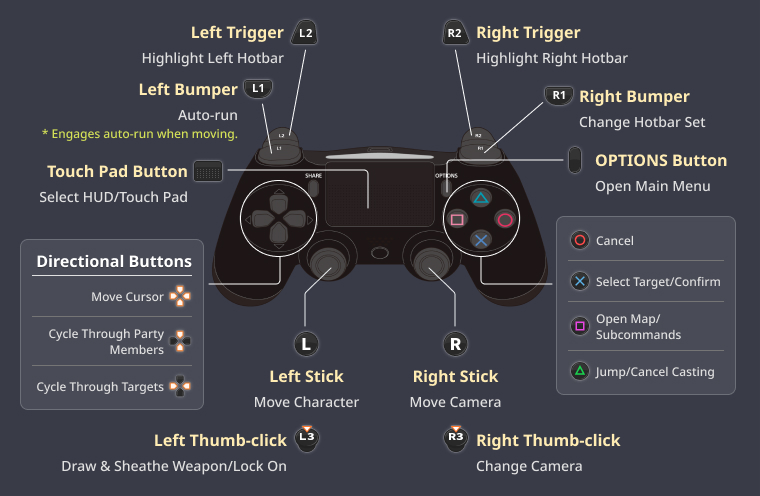
Move your character by using the left stick. Hold down ○ then use the left stick to make your character walk.
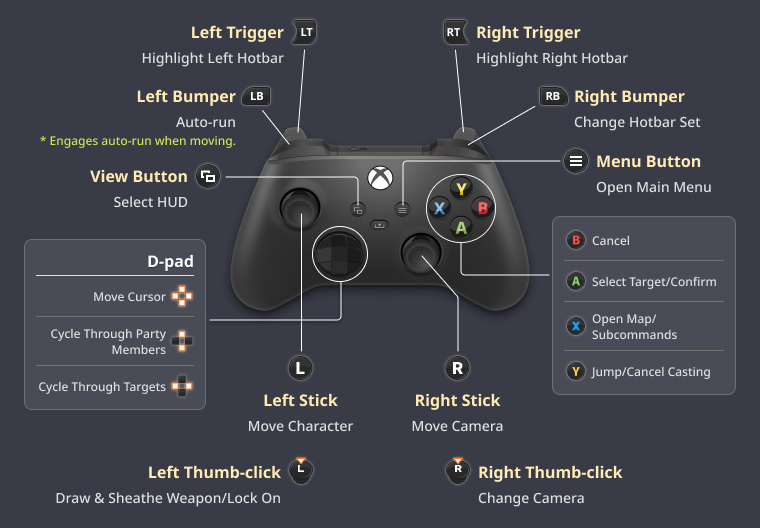
Character Movement
Move your character by using the left stick. Hold down B then use the left stick to make your character walk.
Auto-run
By pressing LB while using the left stick, you can set your character to auto-run. This can be canceled by pressing LB again.
Auto-run
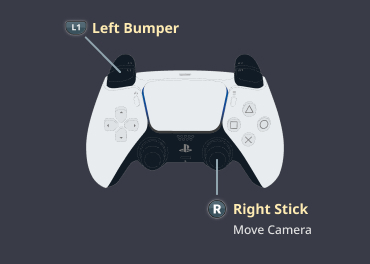
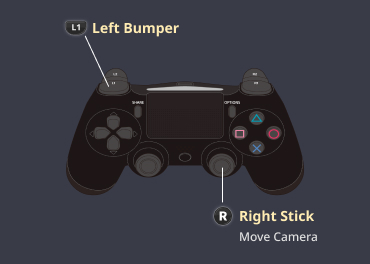
By pressing L1 while using the left stick, you can set your character to auto-run. This can be canceled by pressing L1 again.
Auto-run
By pressing LB while using the left stick, you can set your character to auto-run. This can be canceled by pressing LB again.
Jump
To jump, press Y. This can be used to leap over obstacles like small rocks or low fences.
Jump
To jump, press △. This can be used to leap over obstacles like small rocks or low fences.
Jump
To jump, press Y. This can be used to leap over obstacles like small rocks or low fences.
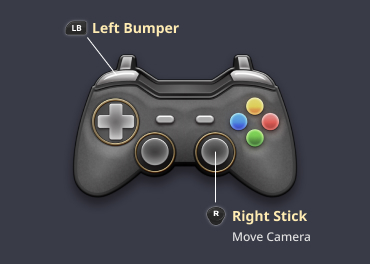
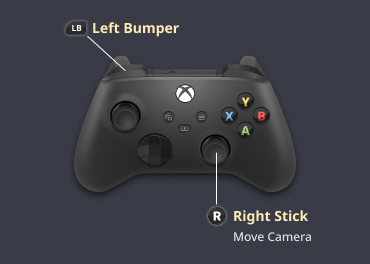
Use the right stick to control the camera. By holding down LB, you can zoom the camera in and out.
Use the right stick to control the camera. By holding down L1, you can zoom the camera in and out.
Use the right stick to control the camera. By holding down LB, you can zoom the camera in and out.
* The direction of camera rotation can be changed in the Character Configuration menu.
By pressing LB+RB, you can draw your weapon for battle or sheathe it.
By pressing L1+R1, you can draw your weapon for battle or sheathe it.
By pressing LB+RB, you can draw your weapon for battle or sheathe it.
* This action can also be performed by pressing L3 when no target is selected.
* When riding a mount, this will allow you to dismount.
* When riding a flying mount, this will allow you to perform the "descend" function.
* This action can also be performed by pressing L3 when no target is selected.
* When riding a mount, this will allow you to dismount.
* When riding a flying mount, this will allow you to perform the "descend" function.
* This action can also be performed by pressing the left stick when no target is selected.
* When riding a mount, this will allow you to dismount.
* When riding a flying mount, this will allow you to perform the "descend" function.
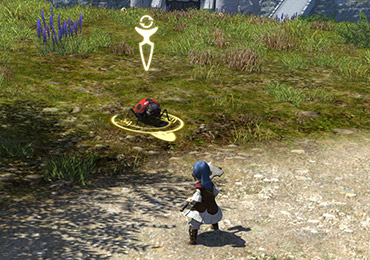
To target a character or object, first face your target and press A. When a target circle appears, press A again to perform an action depending on the target selected.
Player Character: Open command submenu
NPC: Start a conversation
Enemy: Engage auto-attack
Object: Interact with the object
To target a character or object, first face your target and press X. When a target circle appears, press X again to perform an action depending on the target selected.
To target a character or object, first face your target and press X. When a target circle appears, press X again to perform an action depending on the target selected.
To target a character or object, first face your target and press A. When a target circle appears, press A again to perform an action depending on the target selected.
Player Character: Open command submenu
NPC: Start a conversation
Enemy: Engage auto-attack
Object: Interact with the object
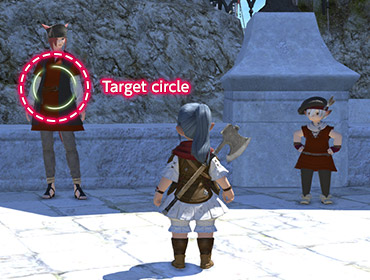
Pressing the directional buttons will display the target circle, which allows you to select temporary targets.
Left and Right Directional Buttons: Cycle through all targets
Up and Down Directional Buttons: Cycle through party member list
LB+↑/↓ : Cycle through enmity list
LB+→/← : Cycle through alliance list
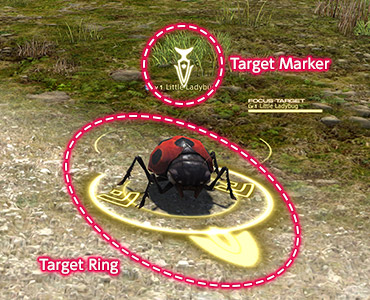
After choosing a target with the target circle, pressing A will change the target circle to a marker to confirm your target is selected.
Pressing the directional buttons will display the target circle, which allows you to select temporary targets.
Left and Right Directional Buttons: Cycle through all targets
Up and Down Directional Buttons: Cycle through party member list
L1+↑/↓ : Cycle through enmity list
L1+→/← : Cycle through alliance list
After choosing a target with the target circle, pressing X will change the target circle to a marker to confirm your target is selected.
Pressing the D-pad will display the target circle, which allows you to select temporary targets.
D-pad Left/Right: Cycle through all targets
D-pad Up/Down: Cycle through party member list
LB+D-pad Up/Down: Cycle through enmity list
LB+D-pad Left/Right: Cycle through alliance list
After choosing a target with the target circle, pressing A will change the target circle to a marker to confirm your target is selected.
* The target circle can still be used after confirming a selected target.

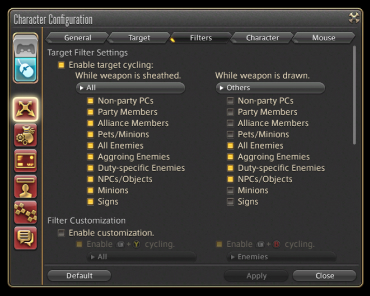
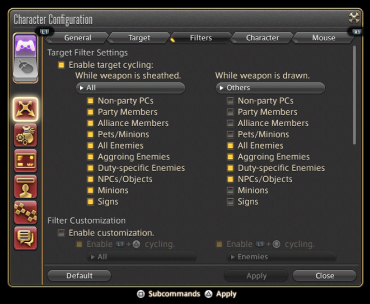
By default, target cycling will use the following target settings:
By default, target cycling will use the following target settings:
Weapon Sheathed: Cycle through all targets
Weapon Drawn: Cycle through Enemies and NPCs/Objects
Target filter settings may be adjusted to your liking.
Furthermore, selecting "Enable customization." will allow for further customization using LB and the four action buttons.
Target filter settings may be adjusted to your liking.
Furthermore, selecting "Enable customization." will allow for further customization using L1 and the four action buttons.
Target filter settings may be adjusted to your liking.
Furthermore, selecting "Enable customization." will allow for further customization using LB and the four action buttons.
* To access the target filter settings, please check the Filters tab under Control Settings in the Character Configuration menu.
Character Movement
Move your character by using the left stick. Hold down B then use the left stick to make your character walk.
Character Movement
Move your character by using the left stick. Hold down ○ then use the left stick to make your character walk.
Character Movement
Move your character by using the left stick. Hold down ○ then use the left stick to make your character walk.
Character Movement
Move your character by using the left stick. Hold down B then use the left stick to make your character walk.
Auto-run
By pressing LB while using the left stick, you can set your character to auto-run. This can be canceled by pressing LB again.
Auto-run
By pressing L1 while using the left stick, you can set your character to auto-run. This can be canceled by pressing L1 again.
Auto-run
By pressing LB while using the left stick, you can set your character to auto-run. This can be canceled by pressing LB again.
Jump
To jump, press Y. This can be used to leap over obstacles like small rocks or low fences.
Jump
To jump, press △. This can be used to leap over obstacles like small rocks or low fences.
Jump
To jump, press Y. This can be used to leap over obstacles like small rocks or low fences.
Use the right stick to control the camera. By holding down LB, you can zoom the camera in and out.
Use the right stick to control the camera. By holding down L1, you can zoom the camera in and out.
Use the right stick to control the camera. By holding down LB, you can zoom the camera in and out.
* The direction of camera rotation can be changed in the Character Configuration menu.
In the PS5® version, the touch pad can be used as a virtual mouse.
* Pressing down on the touch pad will trigger the touch pad button function.
In the PS4® version, the touch pad can be used as a virtual mouse.
* Pressing down on the touch pad will trigger the touch pad button function.
| Drag | Move Virtual Mouse Cursor |
|---|---|
| Tap | Virtual Mouse Left Button Click |
| Double Tap + Hold | Virtual Mouse Left Button Hold |
| Two-finger Tap | Virtual Mouse Left Button Hold (Lock) |
By pressing LB+RB, you can draw your weapon for battle or sheathe it.
By pressing L1+R1, you can draw your weapon for battle or sheathe it.
By pressing LB+RB, you can draw your weapon for battle or sheathe it.
* This action can also be performed by pressing L3 when no target is selected.
* When riding a mount, this will allow you to dismount.
* When riding a flying mount, this will allow you to perform the "descend" function.
* This action can also be performed by pressing L3 when no target is selected.
* When riding a mount, this will allow you to dismount.
* When riding a flying mount, this will allow you to perform the "descend" function.
* This action can also be performed by pressing the left stick when no target is selected.
* When riding a mount, this will allow you to dismount.
* When riding a flying mount, this will allow you to perform the "descend" function.
To target a character or object, first face your target and press A. When a target circle appears, press A again to perform an action depending on the target selected.
Player Character: Open command submenu
NPC: Start a conversation
Enemy: Engage auto-attack
Object: Interact with the object
To target a character or object, first face your target and press X. When a target circle appears, press X again to perform an action depending on the target selected.
To target a character or object, first face your target and press X. When a target circle appears, press X again to perform an action depending on the target selected.
To target a character or object, first face your target and press A. When a target circle appears, press A again to perform an action depending on the target selected.
Player Character: Open command submenu
NPC: Start a conversation
Enemy: Engage auto-attack
Object: Interact with the object
Pressing the directional buttons will display the target circle, which allows you to select temporary targets.
Left and Right Directional Buttons: Cycle through all targets
Up and Down Directional Buttons: Cycle through party member list
LB+↑/↓ : Cycle through enmity list
LB+→/← : Cycle through alliance list
After choosing a target with the target circle, pressing A will change the target circle to a marker to confirm your target is selected.
Pressing the directional buttons will display the target circle, which allows you to select temporary targets.
Left and Right Directional Buttons: Cycle through all targets
Up and Down Directional Buttons: Cycle through party member list
L1+↑/↓ : Cycle through enmity list
L1+→/← : Cycle through alliance list
After choosing a target with the target circle, pressing X will change the target circle to a marker to confirm your target is selected.
Pressing the D-pad will display the target circle, which allows you to select temporary targets.
D-pad Left/Right: Cycle through all targets
D-pad Up/Down: Cycle through party member list
LB+D-pad Up/Down: Cycle through enmity list
LB+D-pad Left/Right: Cycle through alliance list
After choosing a target with the target circle, pressing A will change the target circle to a marker to confirm your target is selected.
* The target circle can still be used after confirming a selected target.
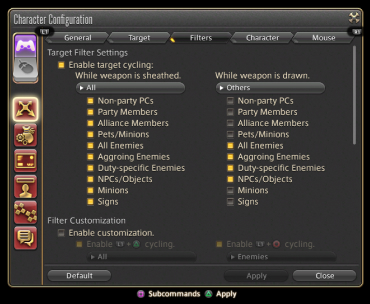
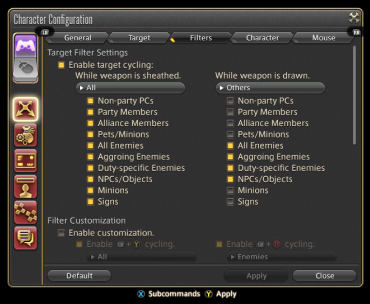
By default, target cycling will use the following target settings:
By default, target cycling will use the following target settings:
Weapon Sheathed: Cycle through all targets
Weapon Drawn: Cycle through Enemies and NPCs/Objects
Target filter settings may be adjusted to your liking.
Furthermore, selecting "Enable customization." will allow for further customization using LB and the four action buttons.
Target filter settings may be adjusted to your liking.
Furthermore, selecting "Enable customization." will allow for further customization using L1 and the four action buttons.
Target filter settings may be adjusted to your liking.
Furthermore, selecting "Enable customization." will allow for further customization using LB and the four action buttons.
* To access the target filter settings, please check the Filters tab under Control Settings in the Character Configuration menu.
You can move your character using either a keyboard or mouse. When using a keyboard, press the WASD keys to move. When using a mouse, press the left and right mouse buttons at the same time to move forward. To change direction while moving, keep both buttons pressed and drag the mouse left or right.
Auto-run
By clicking the mouse wheel, you can set your character to auto-run. Holding the right mouse button while dragging the mouse will change direction. Holding the left mouse button while dragging the mouse will move the camera.
Jump
To jump, press the spacebar on the keyboard. This can be used to leap over obstacles like small rocks or low fences.
For details on other keys assigned to character movement, please refer to the Mouse Controls and Keyboard Controls sections.
* When using the WASD keys to move your character, you can select Standard Type for character-based movement, or Legacy Type for camera-based movement.
To control the camera, drag the mouse while pressing either the left or right button.
Left Button:
Only the camera view will rotate, and not your character.
Right Button:
Your character faces the direction in which you rotate the camera.
* The direction of camera rotation can be changed in the Character Configuration menu.
You can target a character, or an object such as a gate or aetheryte, by moving the mouse cursor over the intended target and clicking the left mouse button.
With a right click, you can perform one of several actions depending on the selected target.
Player Character: Select as a target (right-click to open the subcommand menu)
NPC: Start a conversation
Enemy: Engage auto-attack
Object: Interact with the object
| Command | Default Button |
|---|---|
| Click: Select Target Drag: Rotate Camera |
Left Button |
| Click: Perform Action Based on Target Enemy = Auto-attack NPC = Talk Other Player = Open Commands Submenu |
Right Button |
| Move Character Forward | Left + Right Button |
| Zoom In/Out With Camera Zoom In/Out on Map (When Displayed) |
Scroll Mouse Wheel |
| Turn On/Off Auto-run | Mouse Wheel Button |
* The direction of camera rotation can be changed in the Character Configuration menu.
| Command | Default Button |
|---|---|
| Select/Confirm Display Submenu Drag Area Map (When Displayed) |
Left Button |
| Zoom Map In/Out (When Displayed) | Scroll Mouse Wheel |
| Map Link (When Displayed) |
Ctrl+Right-click
control+Right-click
|
The following is a list of default key bindings. To change key bindings, press NUM-, or click System in the main menu, then select Keybind and choose the appropriate category from the top of the menu.
* When using the WASD keys to move your character, you can select Standard Type for a character-based view, or Legacy Type for a camera-based view.
* Using a gamepad will enable direct chat by default, resulting in keystrokes registering in the log window automatically.
Direct chat must be disabled in order to use commands with the keyboard.
This setting can be changed in the General tab of the Character Configuration menu.
* When using the WASD keys to move your character, you can select Standard Type for a character-based view, or Legacy Type for a camera-based view.
* Using a gamepad will enable direct chat by default, resulting in keystrokes registering in the log window automatically.
* On OS, the command key can function like the control key.
* Operating system commands for shift, control, option, and all function keys take priority over in-game systems. As such, these commands cannot be used for keybinds.
Direct chat must be disabled in order to use commands with the keyboard.
This setting can be changed in the General tab of the Character Configuration menu.
* When using the WASD keys to move your character, you can select Standard Type for a character-based view, or Legacy Type for a camera-based view.
* In controller mode, direct chat will be enabled by default, resulting in keystrokes registering in the log window automatically.
Direct chat must be disabled in order to use commands with the keyboard.
This setting can be changed in the General tab of the Character Configuration menu.
* When using a keyboard with the PS5®, the print screen and pause keys cannot be reassigned, as they are allocated for various system functions.
* When using the WASD keys to move your character, you can select Standard Type for a character-based view, or Legacy Type for a camera-based view.
* In controller mode, direct chat will be enabled by default, resulting in keystrokes registering in the log window automatically.
Direct chat must be disabled in order to use commands with the keyboard.
This setting can be changed in the General tab of the Character Configuration menu.
* When using a keyboard with the PS4®, the print screen and pause keys cannot be reassigned, as they are allocated for various system functions.
* When using the WASD keys to move your character, you can select Standard Type for a character-based view, or Legacy Type for a camera-based view.
* In controller mode, direct chat will be enabled by default, resulting in keystrokes registering in the log window automatically.
Direct chat must be disabled in order to use commands with the keyboard.
This setting can be changed in the General tab of the Character Configuration menu.
| Command | Default Key |
|---|---|
| Move Forward | W |
| Move Back | S |
| Turn Left | A |
| Turn Right | D |
| Strafe Left | Q |
| Strafe Right | E |
| Draw & Sheathe Weapon/Dismount | Z |
| Toggle Between Run/Walk | NUM/ |
| Turn On/Off Auto-run | R |
| Jump | Spacebar |
| Command | Default Key |
|---|---|
| Point Camera Up | ↑ |
| Point Camera Down | ↓ |
| Point Camera Right | → |
| Point Camera Left | ← |
| Zoom Camera In | Page Up |
| Zoom Camera Out | Page Down |
| Change Camera | Home |
| Return Camera to Saved Position | End |
| Save Current Camera Position |
Ctrl+End
control+End
|
| Return Camera to Default Position |
Ctrl+Shift+End
control+shift+End
|
| Flip Camera | V |
| Lock Camera On Target | NUM5 |
| Tilt Camera Up |
Ctrl+↑
control+↑
|
| Tilt Camera Down |
Ctrl+↓
control+↓
|
| Face Camera |
Pause
F15
|
| Command | Default Key |
|---|---|
| Cycle Through Enemies (Nearest to Farthest) | Tab |
| Cycle Through Enemies (Farthest to Nearest) |
Shift+Tab
shift+Tab
|
| Face Target | F |
| Target Self | F1 |
| Target Members in Party List | F2 - F8 |
| Target Pet/Familiar | F9 |
| Target the Target of Your Current Target | T |
| Target Enemy Attacking You |
Shift+T
shift+T
|
| Target Focus Target | F10 |
| Target Nearest Enemy | F11 |
| Target Nearest NPC or Object | F12 |
| Set/Clear Focus Target |
Shift+F
shift+F
|
| Cycle Up Through Enmity List |
Ctrl+NUM8
control+NUM8
|
| Cycle Down Through Enmity List |
Ctrl+NUM2
control+NUM2
|
| Cycle Through Alliance List (Forward) |
Ctrl+NUM6
control+NUM6
|
| Cycle Through Alliance List (Backward) |
Ctrl+NUM4
control+NUM4
|
| Command | Default Key |
|---|---|
| Ready Chat Prompt |
Enter
enter
|
| Ready Text Command | / |
| Temporarily Switch Chat Mode to Reply (Cycle Forward) |
Alt+R
option+R
|
| Temporarily Switch Chat Mode to Reply (Cycle Back) |
Alt+Shift+R
option+shift+R
|
| Temporarily Switch Chat Mode to Say |
Alt+S
option+S
|
| Temporarily Switch Chat Mode to Shout |
Alt+H
option+H
|
| Temporarily Switch Chat Mode to Party |
Alt+P
option+P
|
| Temporarily Switch Chat Mode to Yell |
Alt+Y
option+Y
|
| Reply (Repeat to Cycle Through PCs) |
Alt+R
option+R
|
| Temporarily Switch Chat Mode to Free Company |
Alt+F
option+F
|
| Temporarily Switch Chat Mode to PvP Team |
Alt+T
option+T
|
| Temporarily Switch Chat Mode to Cross-world Linkshell (Cycle Forward) |
Alt+C
option+C
|
| Temporarily Switch Chat Mode to Cross-world Linkshell (Cycle Back) |
Alt+Shift+C
option+shift+C
|
| Temporarily Switch Chat Mode to Linkshell (Cycle Forward) |
Alt+L
option+L
|
| Temporarily Switch Chat Mode to Linkshell (Cycle Back) |
Alt+Shift+L
option+shift+L
|
| Temporarily Switch Chat Mode to Alliance |
Alt+A
option+A
|
| Temporarily Switch Chat Mode to Novice Network |
Alt+N
option+N
|
| Command | Default Key |
|---|---|
| Confirm | NUM0 |
| Cancel | NUM. |
| Display Submenu | NUM* |
| Move Cursor Up/Cycle Up Through Party List | NUM8 |
| Move Cursor Down/Cycle Down Through Party List | NUM2 |
| Move Cursor/Target Cursor Left | NUM4 |
| Move Cursor/Target Cursor Right | NUM6 |
| Cycle Through HUD Components | NUM1 |
| Select the Main Menu | NUM+ |
| Draw/Sheathe Weapon * While Mounted: Dismount |
Z |
| Character | C |
| Currency |
Ctrl+C
control+C
|
| Free Company | : |
| Linkshells | L |
| Inventory | I |
| Armoury Chest |
Ctrl+I
control+I
|
| Open Chocobo Saddlebag |
Shift+Ctrl+I
shift+control+I
|
| Map | M |
| Signs |
Shift+M
shift+M
|
| Waymarks |
Ctrl+M
control+M
|
| Actions and Traits | P |
| Social | O |
| Duty Finder | U |
| Timers |
Ctrl+U
control+U
|
| Journal | J |
| Character Configuration | K |
| System Configuration |
Ctrl+K
control+K
|
| Target Filter | X * |
| Crafting Log | N |
| Gathering Log | B |
| Hunting Log | H |
| Fishing Log | Y |
| Fish Guide |
Ctrl+Y
control+Y
|
| Orchestrion List |
Ctrl+O
control+O
|
| Emote List | (No Default Assignment) |
| System | NUM - |
| Cycle Through UI Component Tabs (Forward/Back) | NUM9/NUM7 |
| Toggle UI Display Mode |
Scroll Lock
F14
|
| Take Screenshot |
Print Screen
F13
|
| Change Window Size |
Ctrl+Home
control+Home
|
| Close UI Component/Open System Menu |
Esc
Escape
|
* When pressed, the target filter will render players, NPCs, enemies, or objects untargetable according to your settings. Although disabled by default, it can be enabled by checking the box for "Enable target cycling" on the Filters tab under Control Settings in the Character Configuration menu.
| Command | Default Key |
|---|---|
| Move Forward | W |
| Move Back | S |
| Turn Left | A |
| Turn Right | D |
| Strafe Left | Q |
| Strafe Right | E |
| Ascend * While Grounded: Jump |
Spacebar |
| Descend * While Grounded: Jump |
Ctrl+Spacebar
control+Spacebar
|
| Land * Available only when flying. * While Grounded: Dismount |
Z |
| Diving * Available only when swimming. |
Ctrl+Spacebar
control+Spacebar
|
* You will be able to ride a flying mount after making a certain amount of progress in-game.
* You will be able to dive after making a certain amount of progress in-game.
PS4® users can also enjoy adventures in Eorzea remotely using the PlayStation®Vita. Please refer to the PlayStation®Vita user's guide for details on remote play.
The following is a list of button allocations for remote play on the PlayStation®Vita.
| DUALSHOCK®4 | PlayStation®Vita |
|---|---|
| Directional Buttons | Directional Buttons |
| Action Buttons (△, ○, X, □) | Action Buttons (△, ○, X, □) |
| L1 / R1 | L / R |
| L2 / R2 | Rear Touch Pad (Upper Left and Right) |
| L3 / R3 | Rear Touch Pad (Lower Left and Right) |
| Left and Right Sticks | Left and Right Sticks |
| OPTIONS Button | START Button |
| SHARE Button | SELECT Button |
| PS Button | Touch Screen Menu (Press PS Button to display) |
| Touch Pad | Touch Screen |
| Touch Pad Button | Touch Screen (Hold briefly) |
* The touch pad button cannot be used when utilizing mouse functionality with the touch screen.
To use the touch pad button, disable "Use touch pad as mouse." under Control Settings in the System Configuration menu.
PS5® users can also enjoy adventures in Eorzea remotely using a smartphone or tablet.
Learn more about remote play.
Xbox Series X|S users can also enjoy adventures in Eorzea remotely using a smartphone or tablet.
Learn more about Xbox Remote Play.
Control settings can be customized when playing remotely.
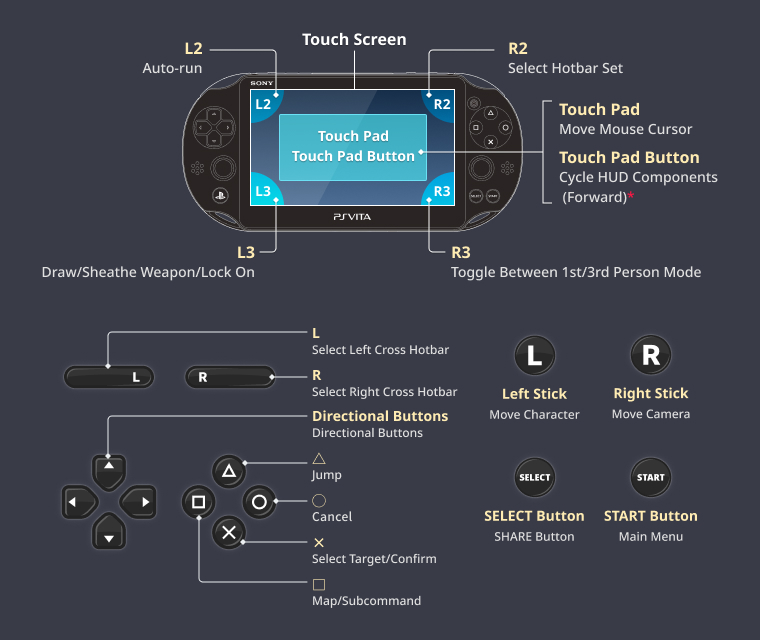
Moreover, it is possible to create a separate control scheme specifically for remote play using the PlayStation®Vita.
| Default Button | Command |
|---|---|
| Directional Buttons | Directional Buttons |
| △ | Jump |
| X | Select Target / Confirm |
| ○ | Cancel |
| □ | Map/Subcommand |
| START Button | Main Menu |
| SELECT Button | SHARE Button |
| Touch Screen (Touch Pad) | Move Mouse Cursor |
| Hold Touch Screen Briefly (Touch Pad Button) | Cycle HUD Components (Forward)* |
| L | Select Left Cross Hotbar |
| R | Select Right Cross Hotbar |
| L2 | Auto-run |
| R2 | Select Hotbar Set |
| L3 | Draw/Sheathe Weapon/Lock On |
| R3 | Change Camera |
| Left Stick | Move Character |
| Right Stick | Move Camera |
* The touch pad button cannot be used when utilizing mouse functionality with the touch screen.
To use the touch pad button, disable "Use touch pad as mouse." under Control Settings in the System Configuration menu.
The following settings can be configured separately for remote play.
| Setting | Menu |
|---|---|
| Button Configuration | System Configuration → Controller Settings → Button Configuration |
| HUD Layout and Size | Main Menu → System → HUD Layout |
| Window Positions and Size | * Window positions are saved automatically. |
| Log Window Font Size | Character Configuration → Log Window Settings → General |
| Log Window Transparency | Character Configuration → Log Window Settings → General |
| Mouse as Touch Pad Controls | System Configuration → Controller Settings |
| Expanded Touch Pad Controls | System Configuration → Controller Settings |
* The touch pad button cannot be used when utilizing mouse functionality with the touch screen.
To use the touch pad button, disable "Use touch pad as mouse." under Control Settings in the System Configuration menu.


