The user interface, or UI for short, refers to the various on-screen elements and menus through which a player interacts with the game. The UI in FFXIV can be adjusted in myriad ways to ensure an enjoyable gaming experience.
This guide will explain how to adjust the UI, and offer tips to help you navigate the game.
Use the default settings…
Or try something creative!
The possibilities are endless!
Use the default settings…
Or try something creative!
The possibilities are endless!

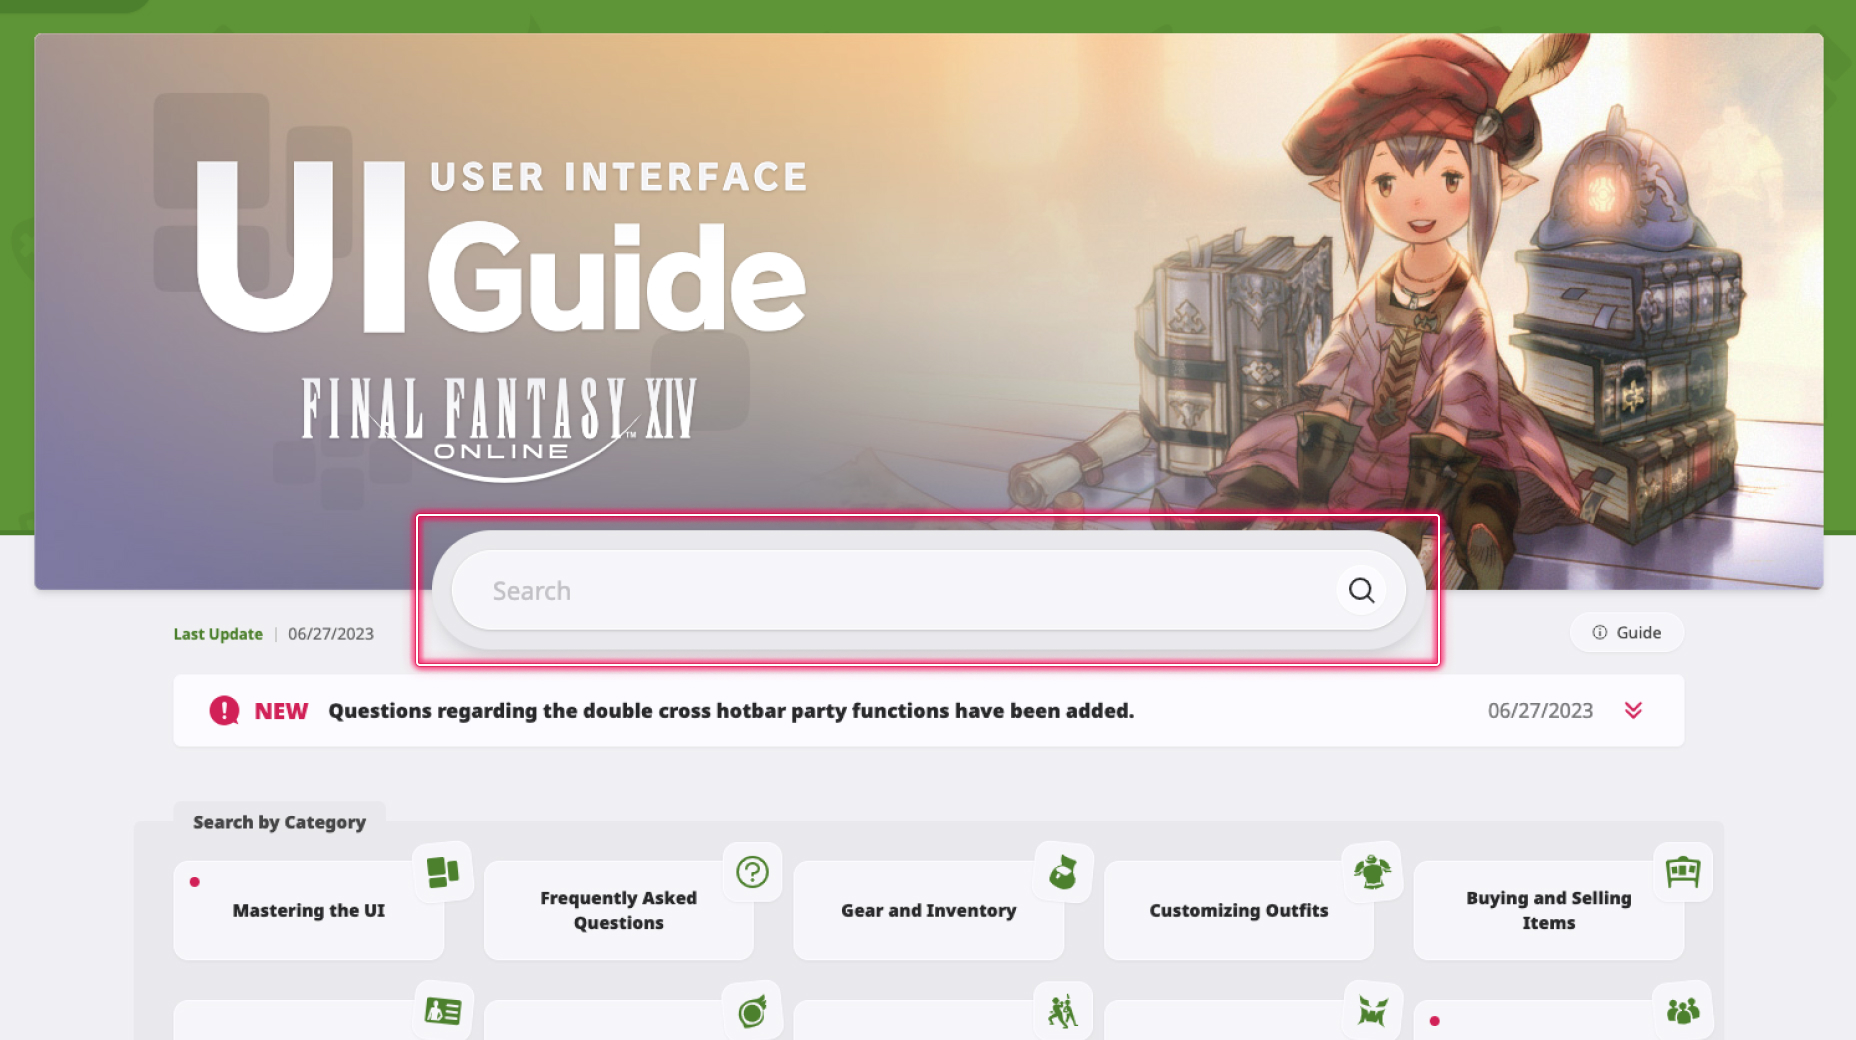
1. Enter a term to search.
2. Find a topic and review its contents.
3. Try out what you've learned!
1. Enter a term to search.

2. Find a topic and review its contents.
3. Try out what you've learned!
(You can view this screen at any time from the guide icon.)
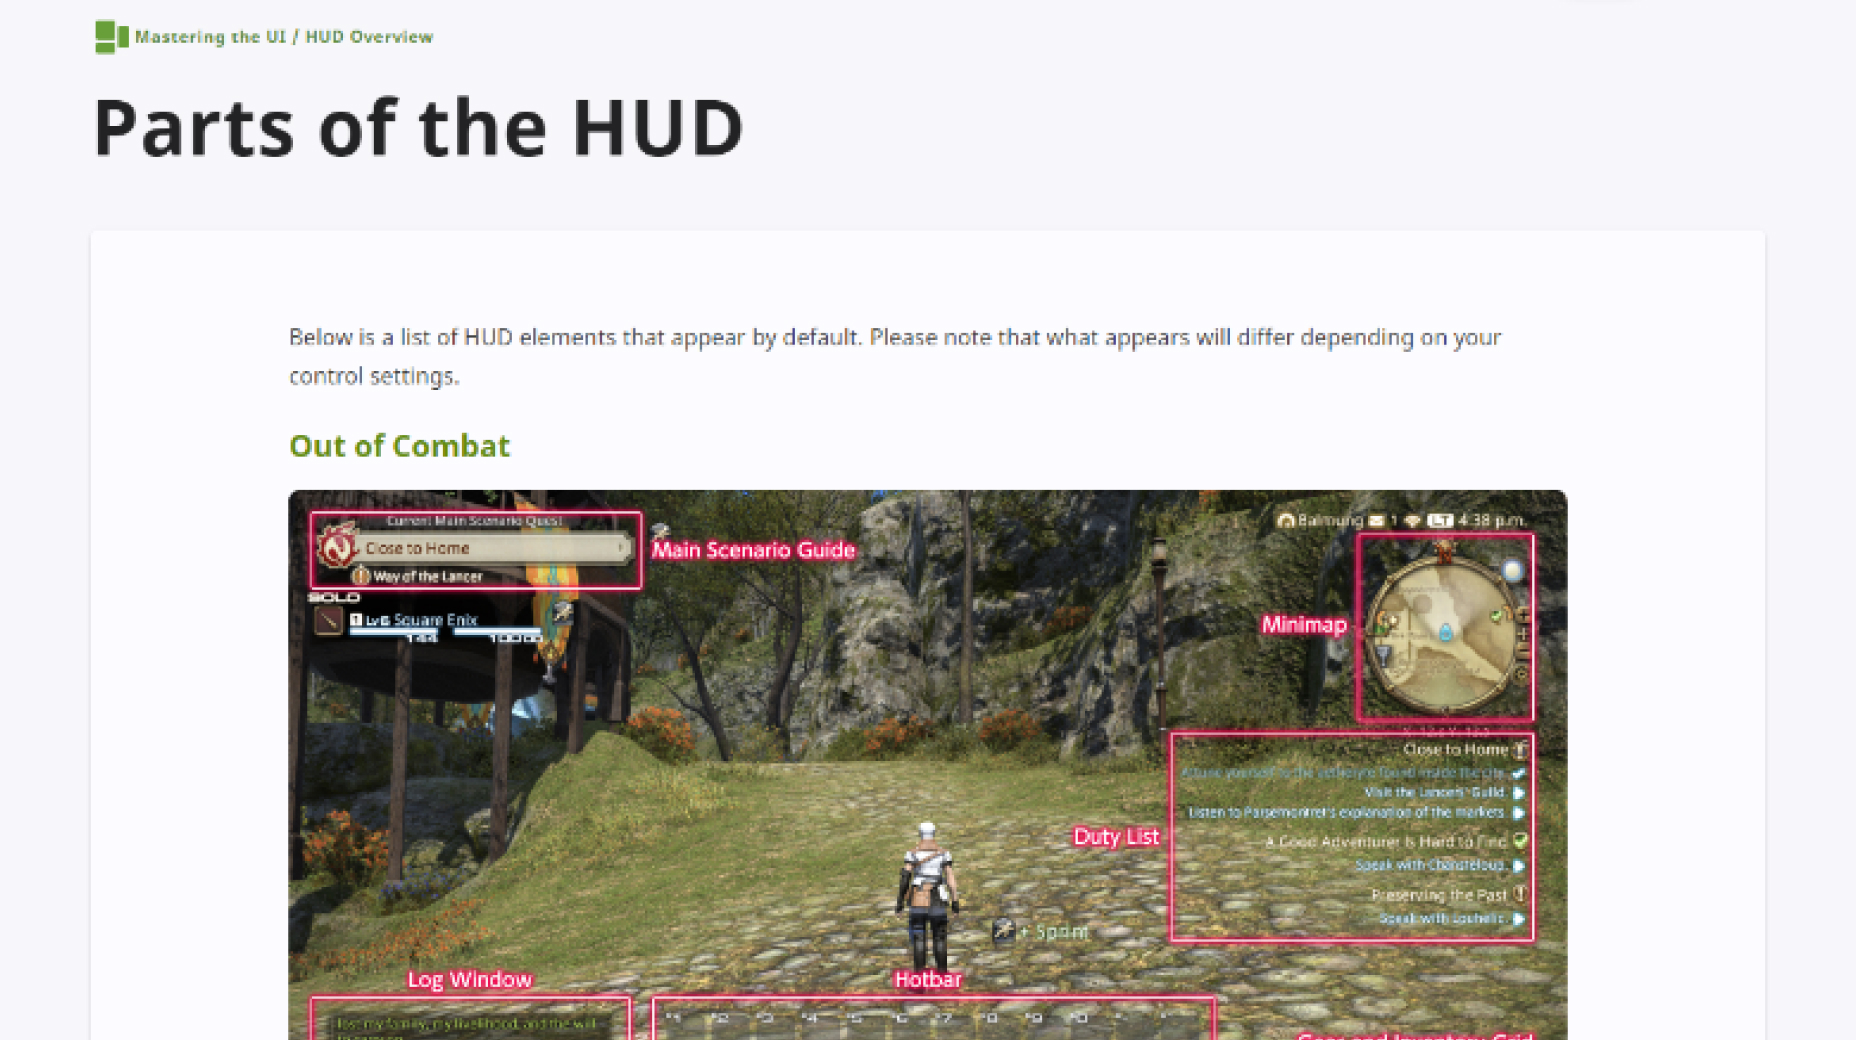
Mastering the UI / HUD Overview
Below is a list of HUD elements that appear by default. Please note that what appears will differ depending on your control settings.
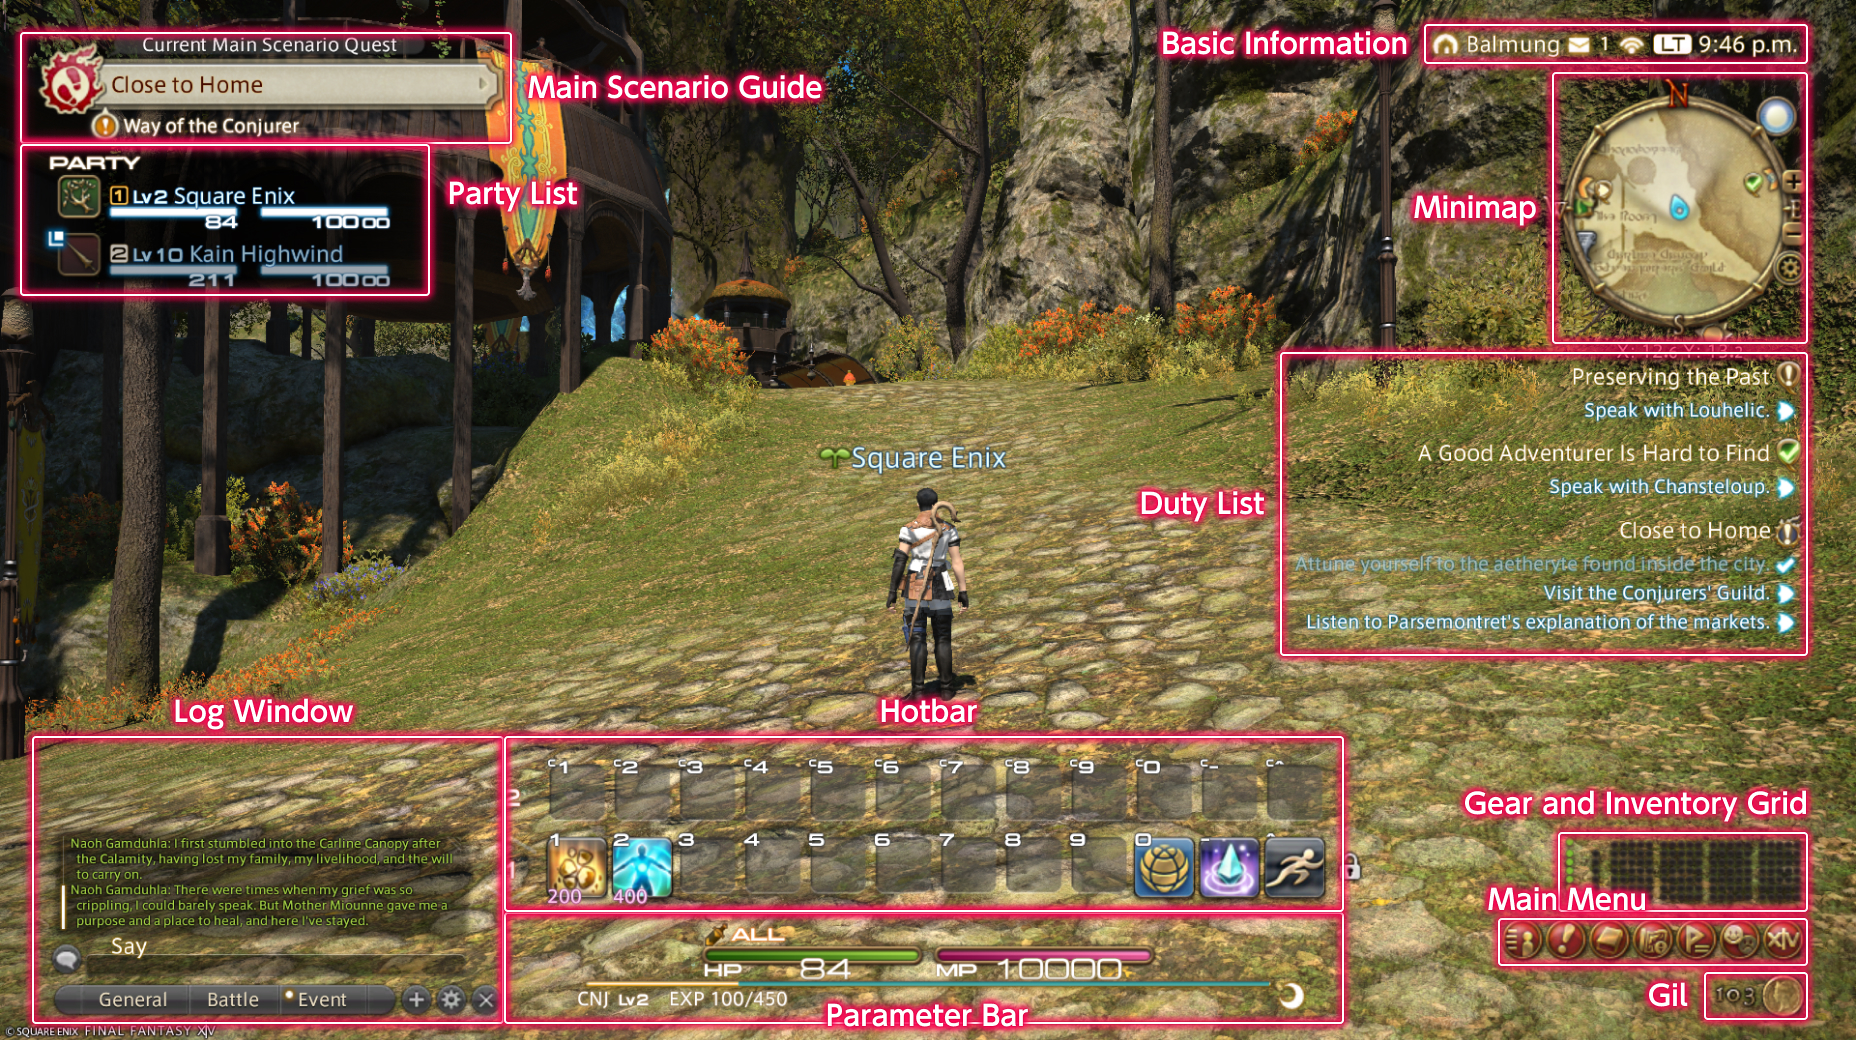
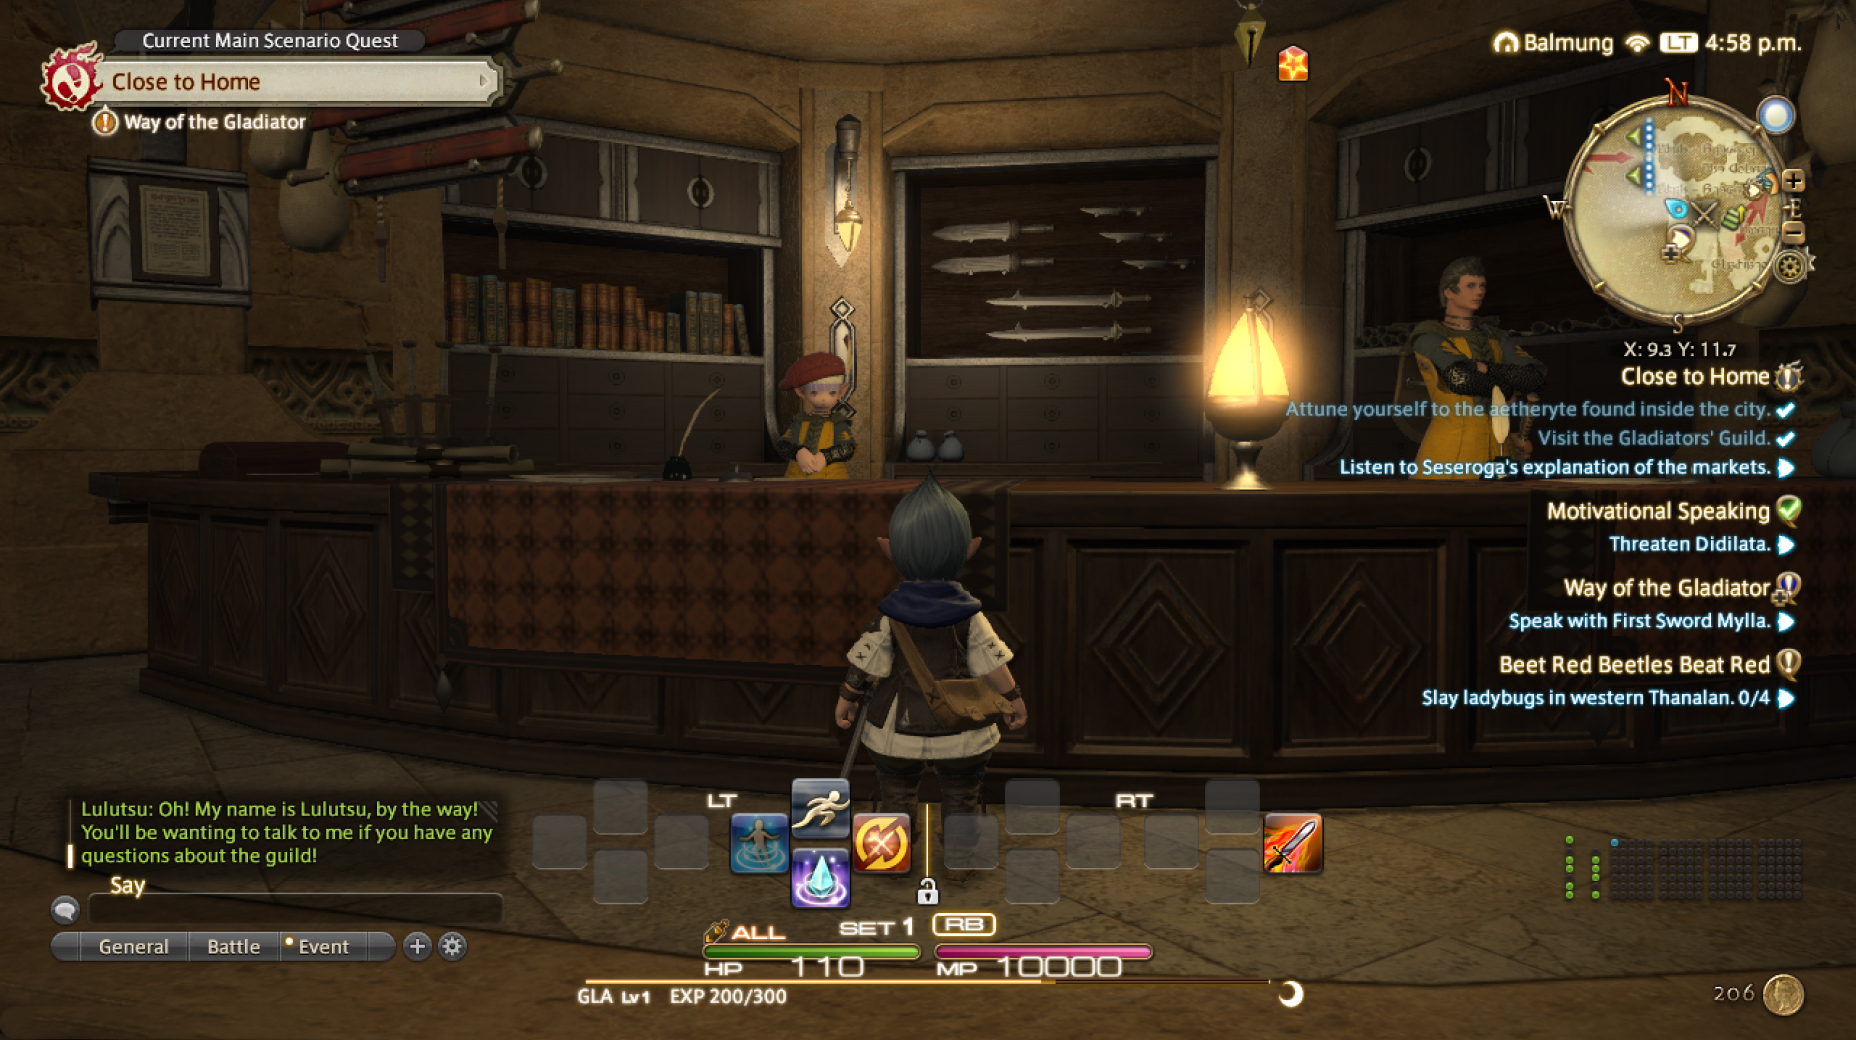
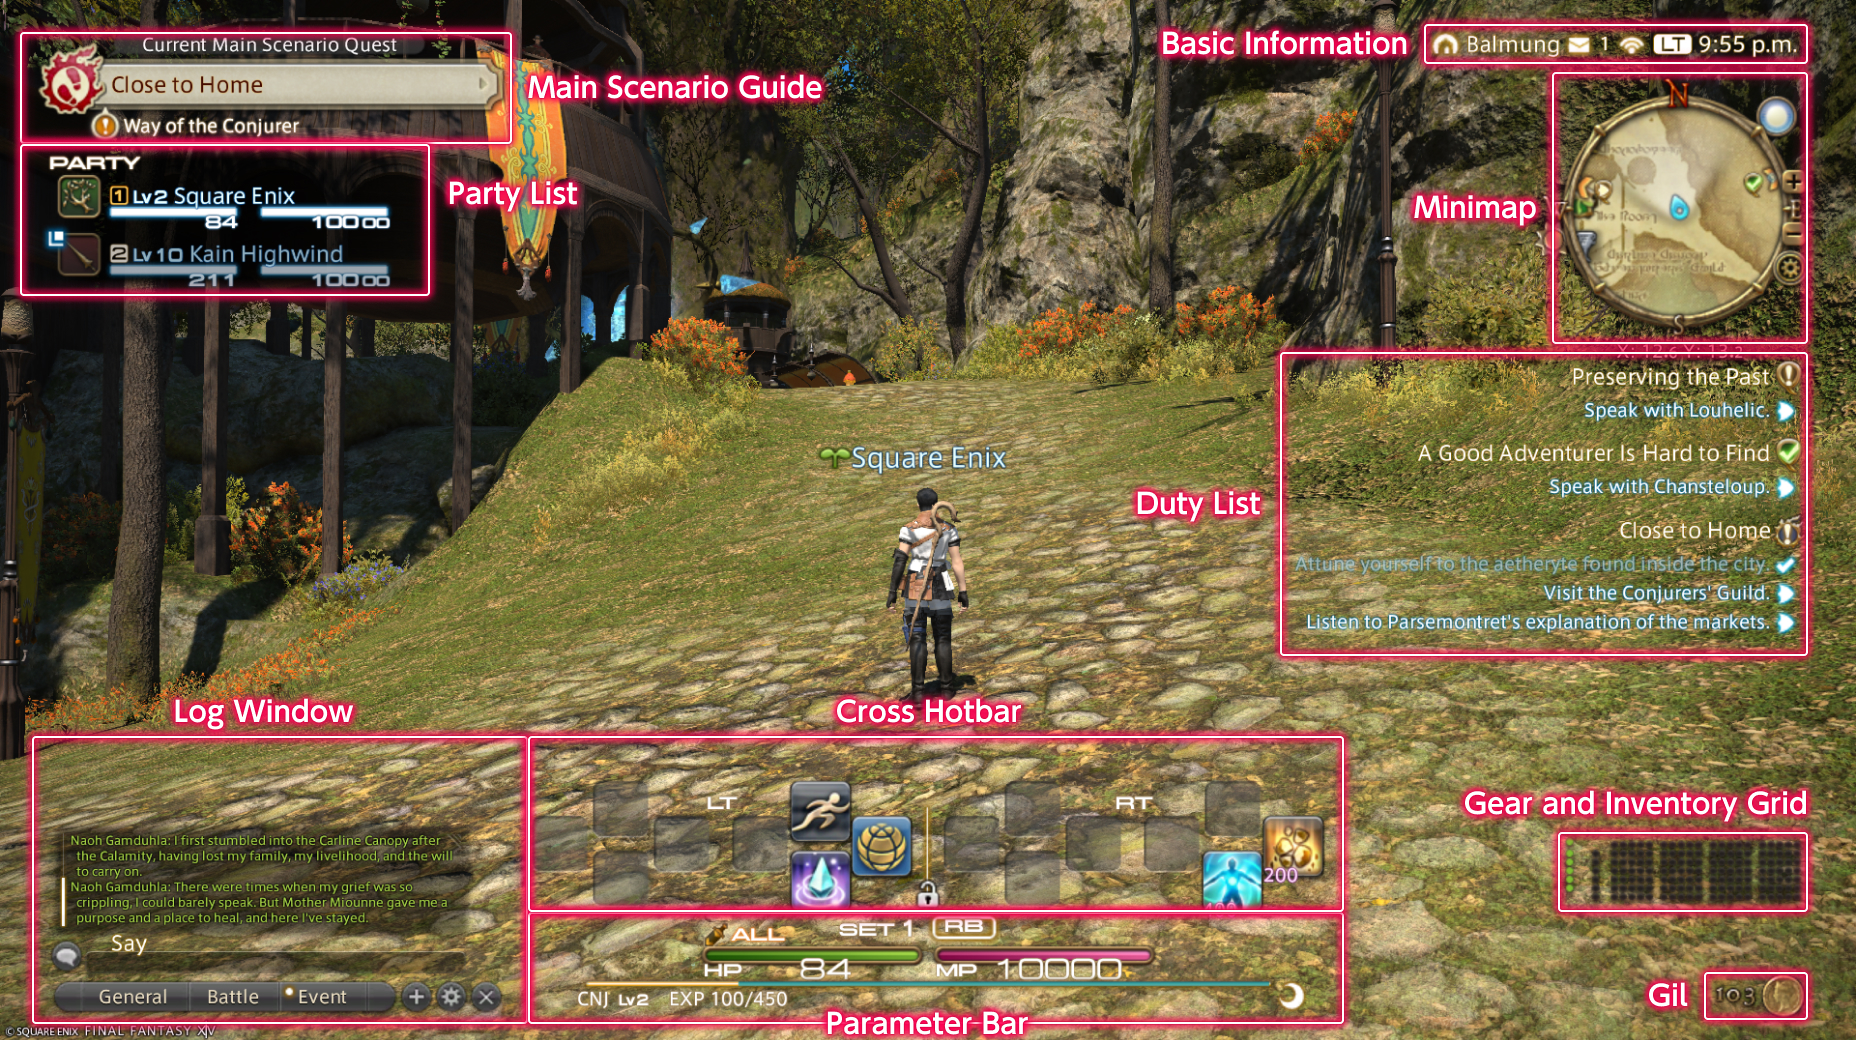
Displays the name of the next available main scenario quest. Clicking on the quest name will open the map and display where you can go to continue your journey through the story.
Quest dialogue, system messages, conversations with other players, and more are displayed here.
The plus icon below the log window will add a new tab, while the cog icon will open the Log Window Settings menu.
Player actions, emotes, items, macros, and target markers can be set to these slots so that they can be accessed by selecting their respective icons. You can change the layout of the hotbars, and even their key settings as you see fit.
Displays your current HP, MP/CP/GP, and experience bar. Upon entering a sanctuary, such as an inn room or aetheryte camp, a crescent moon icon will appear next to your experience bar, indicating you are accruing rested bonus experience.
Displays the current location of your character, as well as the location of nearby landmarks such as shops and quest destinations. You can also click the minimap to open a larger map of the area.
The map of low level areas will appear in their entirety upon visiting them for the first time. In later levels, however, you must explore maps to reveal them completely. That said, you should always remember to attune to local aetherytes. This will make it easier to return to these areas later.
Displays active quest titles and objectives. Selecting the quest title opens the journal, while selecting the objective displays its location on your map.
At a glance you can confirm how many items are in your inventory, represented by the dots on the right. The set of dots on the left represents your character's gear slots. Clicking on the sets opens their respective menus.
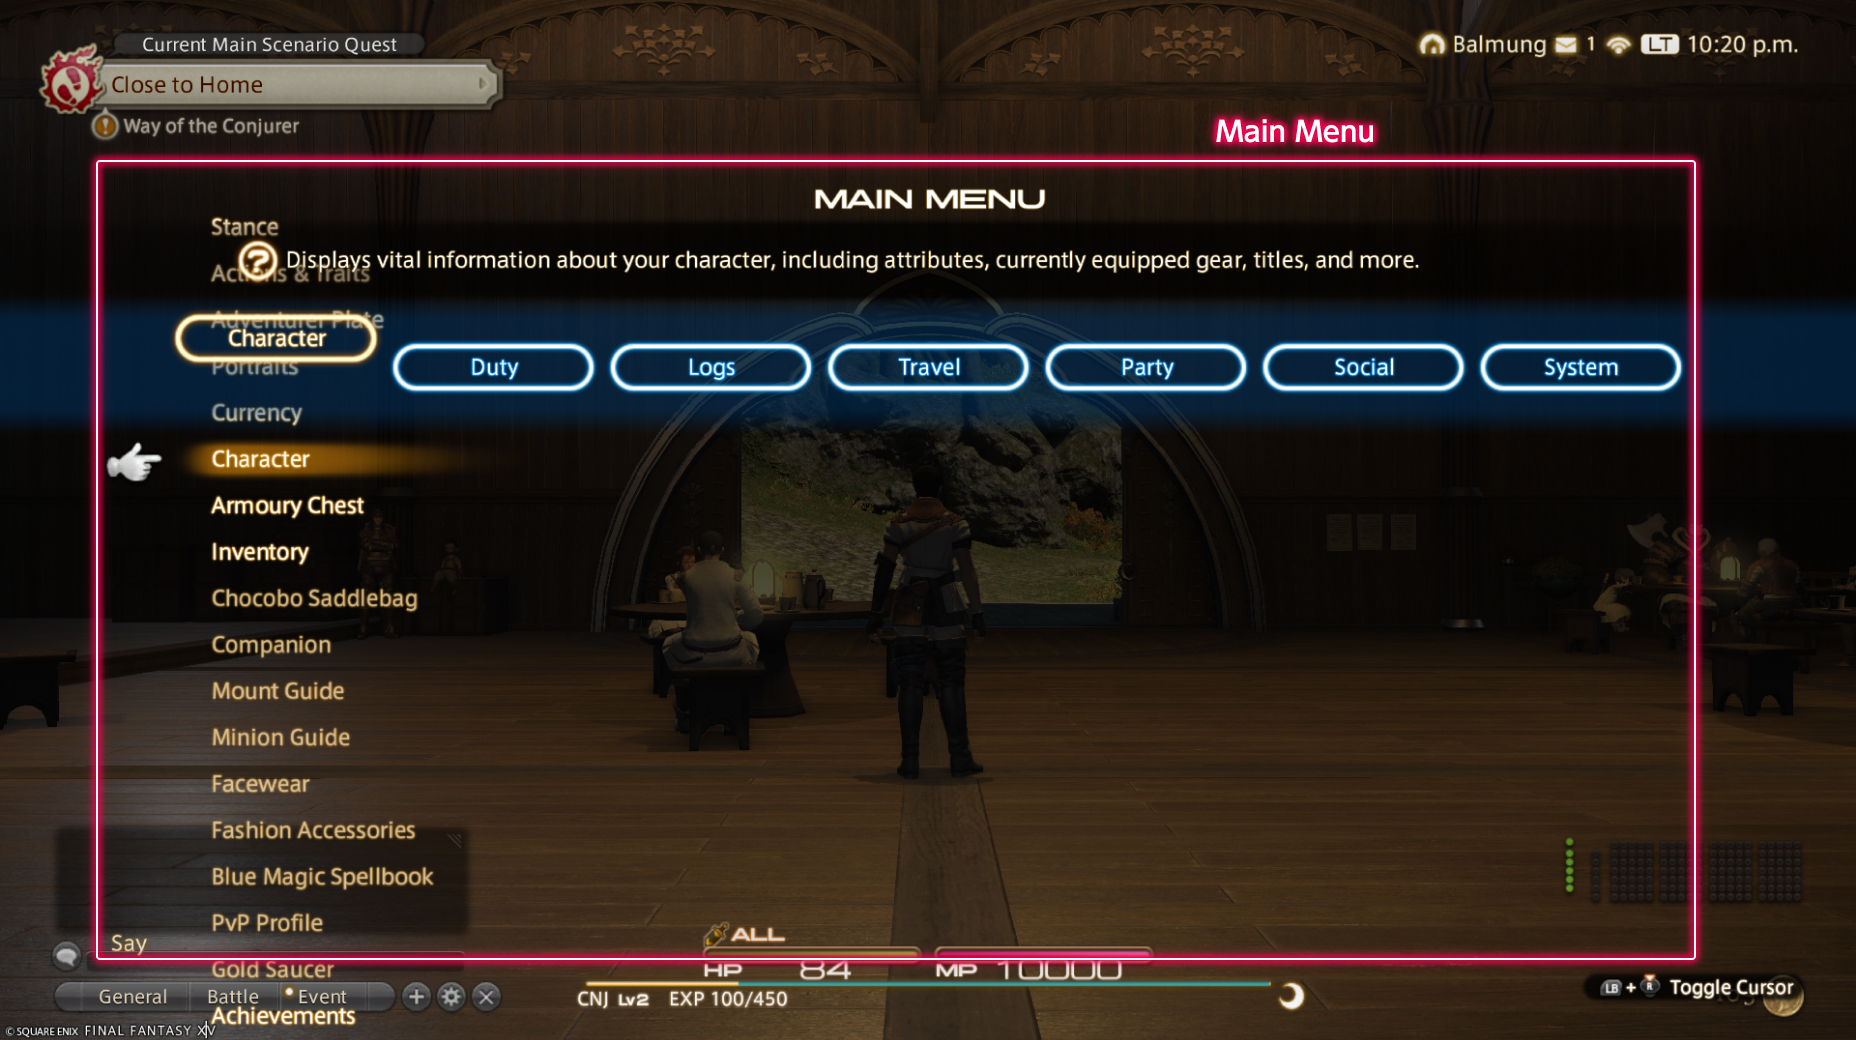
Contains the following categories: Character, Duty, Logs, Travel, Party, Social, and System.
Displays the amount of gil currently in your possession. Selecting the gil icon will open the Currency menu, which displays other currencies such as tomestones and Grand Company seals.
Displays all players and NPCs with whom you form a party. When engaging an enemy, this list will also show the enmity of all party members, as well as any enhancements or enfeeblements affecting them. This list can also be used to immediately target players in your party. Please note the party list will not display when playing alone.
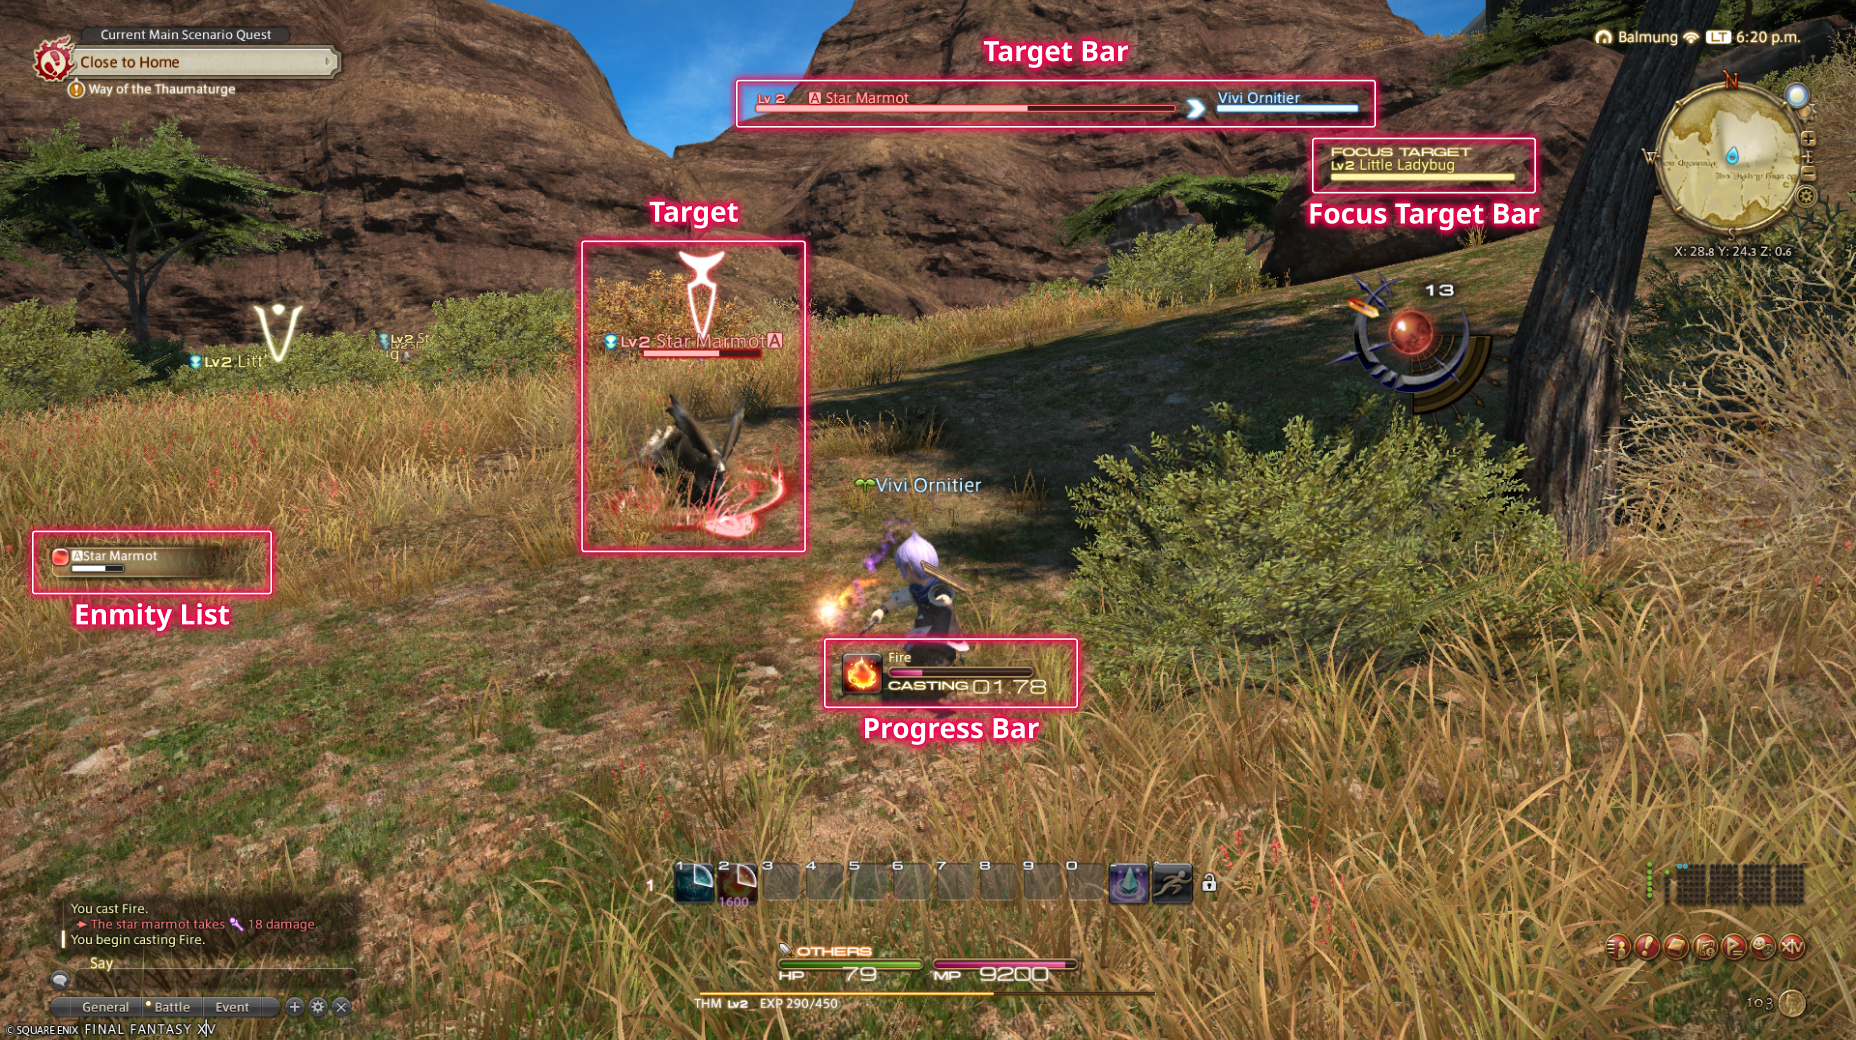
Enmity
Enmity is a measure of how likely an enemy is to attack a player. Your enmity in relation to that of party members is represented by numbers next to your names. The lower the number, the more enmity you have, with an "A" identifying the player currently targeted by the enemy.
How does one build enmity?
Attacks against an enemy and healing effects used on allies generate enmity. Tank classes are designed to generate higher levels of enmity than other classes, but there are occasions where a DPS or healer class will draw the enemy's attention. In such cases, one should stay close to the tank so they may build back enmity as quickly as possible.
How should each role manage enmity?
Tanks should make liberal use of enmity generating abilities to hold an enemy's attention.
DPS should focus on the tank's target, unleashing the extent of their abilities once the tank has the target's full attention.
Healers must maintain the HP of party members, but try not to heal more than necessary to avoid building more enmity than the tank.
Enmity management becomes increasingly important as you gain in levels, so it is important to learn the fundamentals of party dynamics early on.
Indicates the enmity level of the target or targets with which you are currently engaged. A red icon next to their name means they will attack you, so be careful.
Displays information on the object, character, or enemy currently targeted. The bar directly to the right of the target bar indicates the character with which the target is interacting.
In addition to your current target, you can also keep an eye on other enemies or allies by making them focus targets. This is a good way to keep track of one target's HP while dealing with another.
Setting a Focus Target
A focus target can be designated by clicking on the target and selecting Focus Target from the submenu, or by pressing Shift+F.
Indicates the progress of any actions (spell casting, item usage, etc.) that are not instant.
Displays the name of the next available main scenario quest. Press the BACK button (Touchpad on PS5™/PS4™, View button on Xbox Series X|S) to select the quest name and open a map which will display where you can go to continue your journey through the story.
Quest dialogue, system messages, conversations with other players, and more are displayed here.
The plus icon below the log window will add a new tab, while the cog icon will open the Log Window Settings menu.
Player actions, emotes, items, macros, and target markers can be set to these slots, and activated by pressing LT or RT (L2 or R2 on PS5™/PS4™, LT or RT on Xbox Series X|S) together with the hotbar's corresponding button.
There are multiple cross hotbars available, which can be switched between pressing RB (R1 on PS5™/PS4™, RB on Xbox Series X|S) together with the action's corresponding button, or cycled through by tapping RB (R1 on PS5™/PS4™, RB on Xbox Series X|S).
Displays your current HP, MP/CP/GP, and experience bar. Upon entering a sanctuary, such as an inn room or aetheryte camp, a crescent moon icon will appear next to your experience bar, indicating you are accruing rested bonus experience.
Displays the current location of your character, as well as the location of nearby landmarks such as shops and quest destinations. You can press the X button (□ on PS5™/PS4™, X on Xbox Series X|S) to open a larger map of the area.
The map of low level areas will appear in their entirety upon visiting them for the first time. In later levels, however, you must explore maps to reveal them completely. That said, you should always remember to attune to local aetherytes. This will make it easier to return to these areas later.
Displays active quest titles and objectives. Selecting the quest title opens the journal, while selecting the objective displays its location on your map.
At a glance you can confirm how many items are in your inventory, represented by the dots on the right. The set of dots on the left represents your character's gear slots.
To view the items and gear in your inventory, open the Main Menu and select Inventory or Armoury Chest from the Character tab.
Contains the following categories: Character, Duty, Logs, Travel, Party, Social, and System.
Displays the amount of gil currently in your possession. Open the main menu and select Currency under the Character tab to display a list of currencies including tomestones and Grand Company seals.
Displays all players and NPCs with whom you form a party. When engaging an enemy, this list will also show the enmity of all party members, as well as any enhancements or enfeeblements affecting them. This list can also be used to immediately target players in your party. Please note the party list will not display when playing alone.
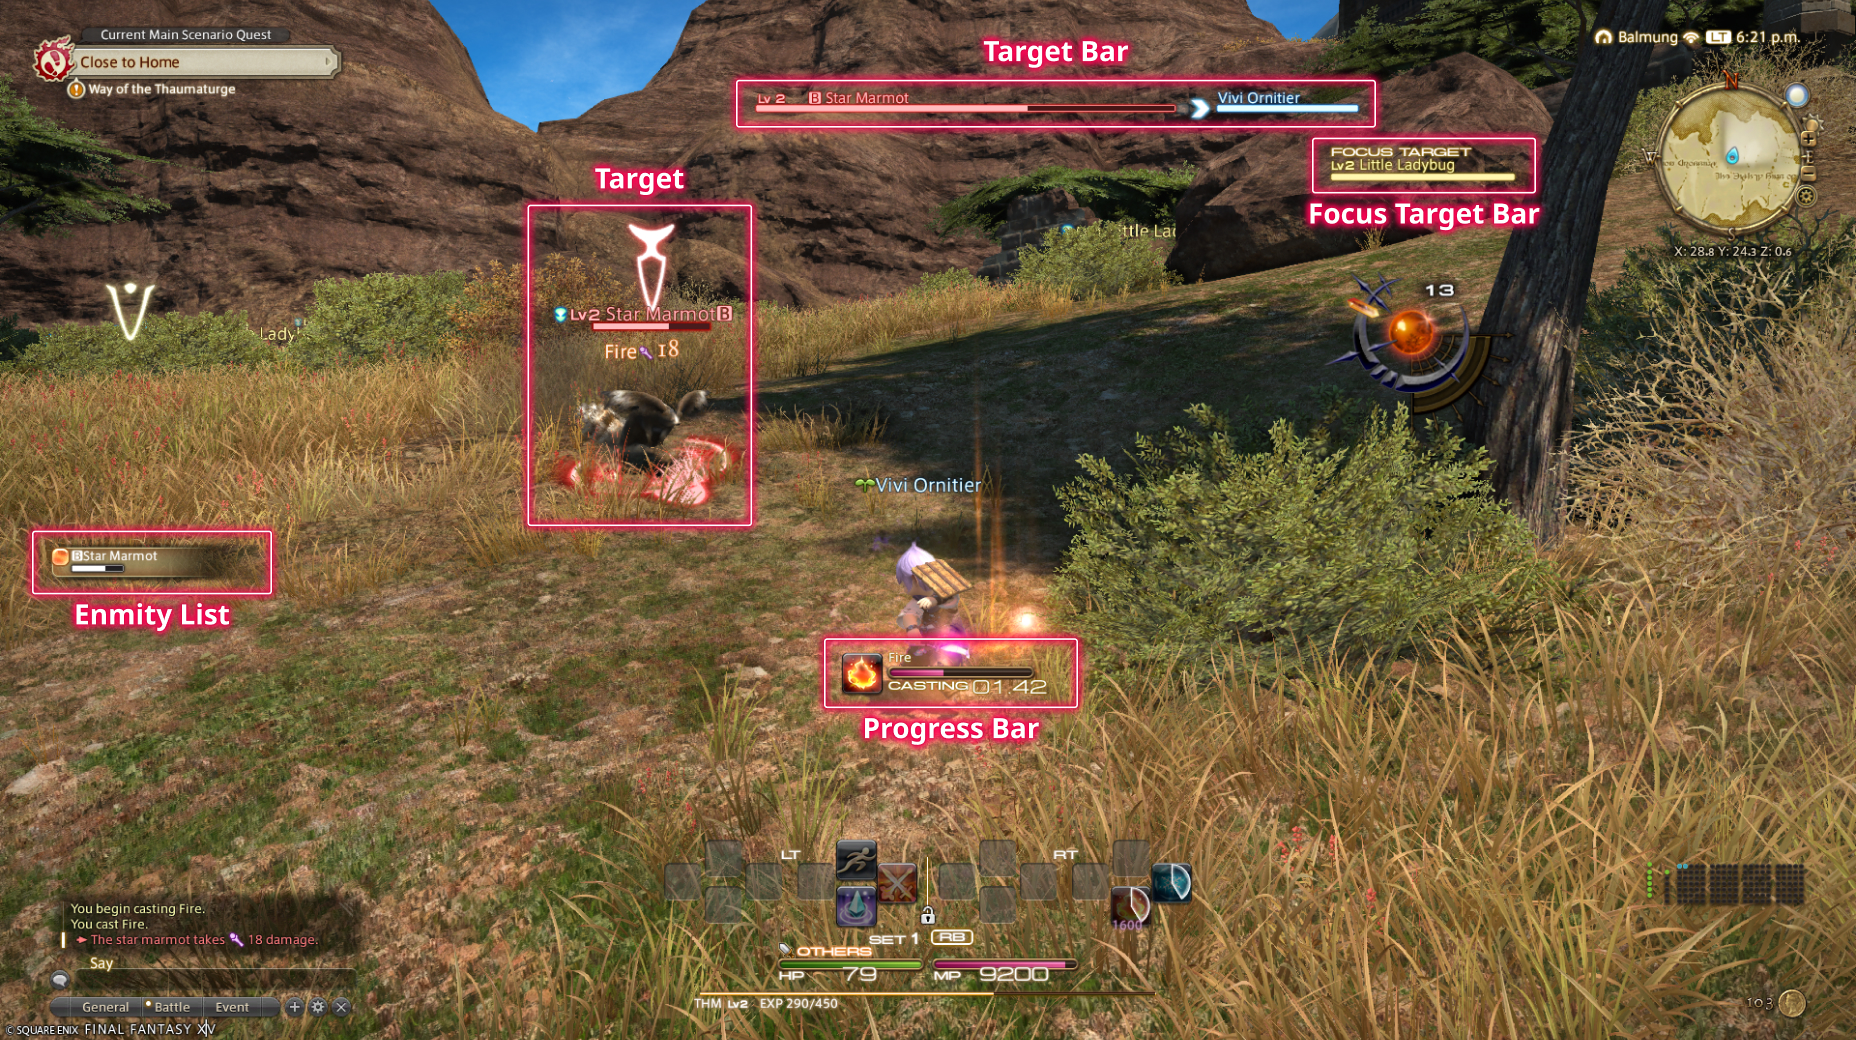
Enmity
Enmity is a measure of how likely an enemy is to attack a player. Your enmity in relation to that of party members is represented by numbers next to your names. The lower the number, the more enmity you have, with an "A" identifying the player currently targeted by the enemy.
How does one build enmity?
Attacks against an enemy and healing effects used on allies generate enmity. Tank classes are designed to generate higher levels of enmity than other classes, but there are occasions where a DPS or healer class will draw the enemy's attention. In such cases, one should stay close to the tank so they may build back enmity as quickly as possible.
How should each role manage enmity?
Tanks should make liberal use of enmity generating abilities to hold an enemy's attention.
DPS should focus on the tank's target, unleashing the extent of their abilities once the tank has the target's full attention.
Healers must maintain the HP of party members, but try not to heal more than necessary to avoid building more enmity than the tank.
Enmity management becomes increasingly important as you gain in levels, so it is important to learn the fundamentals of party dynamics early on.
Indicates the enmity level of the target or targets with which you are currently engaged. A red icon next to their name means they will attack you, so be careful.
Displays information on the object, character, or enemy currently targeted. The bar directly to the right of the target bar indicates the character with which the target is interacting.
In addition to your current target, you can also keep an eye on other enemies or allies by making them focus targets. This is a good way to keep track of one target's HP while dealing with another.
Setting a Focus Target
A focus target can be designated by choosing a target, pressing X (□ on PS5™/PS4™, X on Xbox Series X|S) to open the submenu, then selecting Focus Target.
Indicates the progress of any actions (spell casting, item usage, etc.) that are not instant.